This is the entire handbook on one page. To save it as a PDF, press Ctrl / Cmd + P and choose Save as PDF, or use the button below. Navigation and sidebars are hidden automatically when printing.
Operator procedures
These are the working procedures for the payment platform. They tell you how to operate the features, install the workstation service, set up a handheld, take a payment, push offline transactions, reconcile at the end of the week. One task per page, written so you can follow it standing at the counter or holding the device.
Where to start
Pick the section that matches what you are working on.
- Workstation: the Windows payment service at the counter. Install and reinstall, daily procedures, terminals and EMV, settings, and the errors you see on screen.
- Handheld: the handheld payment app. Set it up, learn each mode of operation, take payments, and push offline transactions.
- Cloud Portal: the merchant web portal. Reconcile transactions, provision the configs that devices pull down, and run Order & Pay.
New to the platform? Read How it all fits together first, it shows how the three pieces connect, then Getting started for hardware and prerequisites.
Need a fix fast? Managers can jump straight to the common POS errors quick reference: look up what you see, what it means, and the quick fix.
How to read a procedure
Every procedure page is laid out the same way:
- Purpose: what the procedure does, in one line.
- When to use this: the situation that sends you here.
- Steps: numbered, in order, with the on-screen controls in bold so you can match them to the screen.
- Verify: how you know it worked.
- See also: the related pages, so you can follow how the features tie together.
A few conventions:
- On-screen labels are written exactly as they appear, like the Reload Workstation Config button or the SAF Stats button, so you can match them.
- Where a value is specific to your site, you will see a placeholder such as
<your Merchant ID>. Fill in your own. - Where a screenshot still needs to be captured, you will see a bracketed note like [INSERT SCREENSHOT: …]. The step still works without it.
See also
How it all fits together
Purpose: Show how the three parts of the platform connect, so the rest of these procedures make sense.
When to use this: Read it once before you start, and come back to it whenever you are not sure which section a task belongs in.
The short version
Payments are taken in two places, the workstation at the counter and the handheld in someone's hand. Both report up to the cloud portal, where you see and reconcile everything. The cloud portal also holds the configuration for each device, which the workstation and handheld pull back down.
        TAKE PAYMENTS                         SEE & RECONCILE
   ┌──────────────────────┐             ┌──────────────────────────┐
   │     Workstation      │  ── report ─▶│                          │
   │  (counter / fixed)   │             │       Cloud Portal       │
   ├──────────────────────┤             │  transactions, batches,  │
   │      Handheld        │  ── report ─▶│  reconciliation, reports │
   │  (in hand / mobile)  │             │                          │
   └──────────────────────┘             └──────────────────────────┘
            ▲    ▲                                   │
            │    └───────── pull config ─────────────┤
            └──────────────── pull config ───────────┘
                 (Merchant ID, secure device, com mode,
                  tip presets, mobile terminal, routing)
This is the spine of the site:
- A payment is taken at the workstation or the handheld.
- It reports up to the cloud portal, where it appears in Transactions and gets reconciled against the processor.
- The cloud portal provisions the configs, the settings each device needs, and the workstation and handheld pull those configs down when they reload.
Where each task lives
| You want to… | Go to |
|---|---|
| Install or reinstall the counter payment service | Workstation · Install & reinstall |
| Reload a device's settings, push its offline transactions, reset a terminal | Workstation · Daily procedures and Handheld · Push offline transactions |
| Use a handheld as the terminal for a counter | Handheld · Mobile Terminal mode ⇄ Workstation · Mobile Terminal |
| Look at sales, close a batch, reconcile the week | Cloud · Transactions & reconciliation |
| Create or change the settings a device pulls down | Cloud · Provisioning configs |
| Let guests order and pay from a QR code, or charge to a room | Cloud · Order & Pay / QR and Cloud · Charge to room |
The one rule that ties devices to the cloud
A device only works when its cloud config matches the device. Three values do the most damage when they are wrong, and all three are set in the cloud portal:
- Workstation Name must equal the machine's Windows hostname, or the workstation service won't start. See Provisioning and Install & reinstall.
- Secure Device must match the actual reader model, or handhelds stop working. See Provisioning.
- Com mode must match how the reader is connected, or payments stop. See Provisioning.
See also
Getting started
Purpose: List the hardware and the few things you need in place before you set anything up, and point you to the right starting procedure.
When to use this: Before a new install, a new device, or your first time on the platform.
What you need before you start
- A Merchant ID. Every device is tied to one. You enter it during install and it identifies the location to the processor. If you don't have it, get it from the cloud portal or from your contact before you begin.
- A cloud portal account. Reconciliation, provisioning, and Order & Pay all live in the portal. You sign in with your own credentials.
- Network access. The workstation and handhelds need to reach the local network and the internet. Card readers connect over USB or over the network depending on the site.
- The POS for on-device ordering. A handheld running in the default Order & Pay mode expects the point-of-sale software to be running on the same device. The other handheld modes do not.
Two dependencies on the workstation
The counter PC relies on two third-party pieces. You don't operate them day to day, but you'll see them named during install and in errors, so it helps to know what each one is:
- NETePay: the payment gateway. It's the piece that actually talks to the card processor. If it isn't running, payments fail with a socket error (see Common errors).
- dsiEMVUS: the card-reader middleware. It lets the service drive the EMV reader. The installer bundles it, and during a reinstall you cancel its maintenance prompt because it's already on the machine (see Install & reinstall).
Supported hardware
Workstation
A standard Windows PC at the counter runs the payment service. It talks to a countertop card reader.
Common countertop readers:
- Verifone P400 and Verifone M400
- PAX A920 Pro (also used as a handheld)
Each reader model has a matching secure-device profile you set in the cloud, see the device reference.
Handheld
The handheld payment app runs on these devices:
- PAX A920 and A920 Pro
- PAX A77
- PAX A3700
- PAX A6650
External card readers used with some devices:
- IDTech VP3300
- IDTech VP3350
Full model-to-profile list is in the handheld reference and the workstation device reference.
Where to begin
- Standing up a counter for the first time, or repairing one: start at Workstation · Install & reinstall.
- Setting up a handheld: start at Handheld · Setup & workstation binding.
- Setting up reporting, or creating the config a device will pull down: start at Cloud · Provisioning configs.
See also
- How it all fits together
- Workstation · Install & reinstall
- Handheld · Setup & workstation binding
- Cloud · Provisioning configs
Common POS errors: quick reference
Purpose: Look up an on-screen error and get the fix in seconds, without reading a whole runbook.
When to use this: A payment failed or a screen shows an error and you need the next move now. Find the message you see, read what it means, do the quick fix. The last column links to the full procedure if the quick fix doesn't clear it.
Skim the message you see on screen in the first column. The codes (like 05 or 51) come from the card issuer, not from us, they tell you why the bank said no.
Payment device & gateway errors
These come from the counter workstation or the reader.
| You see | What it means | Quick fix | Full procedure |
|---|---|---|---|
| Could not communicate with Payment Provider | The till can't reach the payment service. | Confirm the payment service is running, then have the till retry. | Workstation · Common errors |
| Socket Error … 3006 | The payment gateway on the PC isn't running. | Start the gateway (NETePay), then retry. | Workstation · Common errors |
| Timeout waiting for PinPad | The customer didn't act in time, or the reader is asleep. | Wake the reader and run the payment again. | Workstation · Common errors |
| Failed on Com Port / NAK | The reader fully lost its connection to the PC (usually the end of a cascade). | Power-cycle the reader: a P400 (one cable) unplug and replug; an M400 (separate power) disconnect power and USB. Then restart the service. | Workstation · Terminal & EMV |
| Declined or parsing gateway error while adding to a running tab | Common on bar tabs when topping up an authorization through the night. | Re-run it as a brand-new authorization on the same card. | Workstation · Common errors |
Handheld errors
These come from the handheld app.
| You see | What it means | Quick fix | Full procedure |
|---|---|---|---|
| App won't respond / closed | The app isn't running. | Tap the Vitabyte tile to reopen it, or tap Back To POS. | Handheld · Common errors |
| Connection Lost | The reader dropped mid-transaction. | Tap Retry; if it stays, tap Restart App; last resort, reboot the device. | Handheld · Reader & EMV |
| Payments cancel on their own | Usually low battery / power-saving. | Charge the device and turn off battery saver. | Handheld · Common errors |
| Payments are slow | Weak Wi-Fi. | Move closer to the access point or fix the network. | Handheld · Common errors |
| Card times out / Remove Card | The reader timed out. | Retry; on a VP3300/VP3350, tap the card on the back of the device. | Handheld · Reader & EMV |
What the decline codes mean
When the bank declines a card, the screen shows a short code. These are the ones you will see most. For what the codes mean across processors, the three-digit codes (a 605 is an 05), and the virtual-wallet increment declines, see Error codes.
| Code | Means | What to tell the customer |
|---|---|---|
| 05 | Do not honor (the most common decline) | The bank declined it. Try another card. |
| 51 | Insufficient funds | Try another card. |
| 54 | Expired card | Card is expired, use a different one. |
| 14 | Invalid card number | Re-key or use a different card. |
| 55 | Incorrect PIN | Re-enter the PIN. |
| 59 | Suspected fraud | Try a different card. (When testing, use a debit card.) |
We never make up codes. Every code here comes from the card issuer's response as the app reads it. WorldPay and TSYS can phrase or number some responses differently, Error codes explains the pattern.
See also
- Error codes (what they mean across processors)
- Workstation · Common errors
- Handheld · Common errors
- Workstation · Terminal & EMV management
- Handheld · Reader & EMV management
Technical Triage
Purpose: When a payment is failing, start here. You pick how this site takes payments (its mode of operation), then work the issues that are common to that mode.
When to use this: A payment failed, a reader won't respond, a check won't close, or you just need a starting point. This page routes you to the right fixes faster than reading a whole runbook.
Two things make every triage below faster. Do them once per site.
- Filter Event Viewer to the VitaPay logs so you can read only the payment service's entries around the time of a failure.
- Understand IP reservations: the Order & pay with a pinpad mode (Mobile Terminal) depends on the reader keeping the same address.
What mode of operation are you using?
Pick the row that matches how this site rings and takes a payment. Each page lists the issues that hit that mode, then links to the issues that can happen in any mode.
| You are... | Go here |
|---|---|
| Ringing the order on a counter till, customer pays on a pinpad reader (fixed, or a handheld acting as the counter's reader) | Order & pay with a pinpad |
| Taking the order and the payment on the same handheld | Order & pay with a handheld |
| Pulling up an already-rung check on a handheld and paying it at the table | Pull & pay with a handheld |
| Not sure which of these you're running | Help me figure it out |
This list covers the most common setups today and will grow as more are added. If none fit, start with Help me figure it out or the issues that can happen in any mode.
Issues that can happen in any mode
Some problems show up no matter how you take payment:
See Issues in any mode for all of them.
Decline and error codes
A card declined with a number? See Error codes for what the code means, why the same decline differs by processor, and the virtual-wallet increment declines.
See also
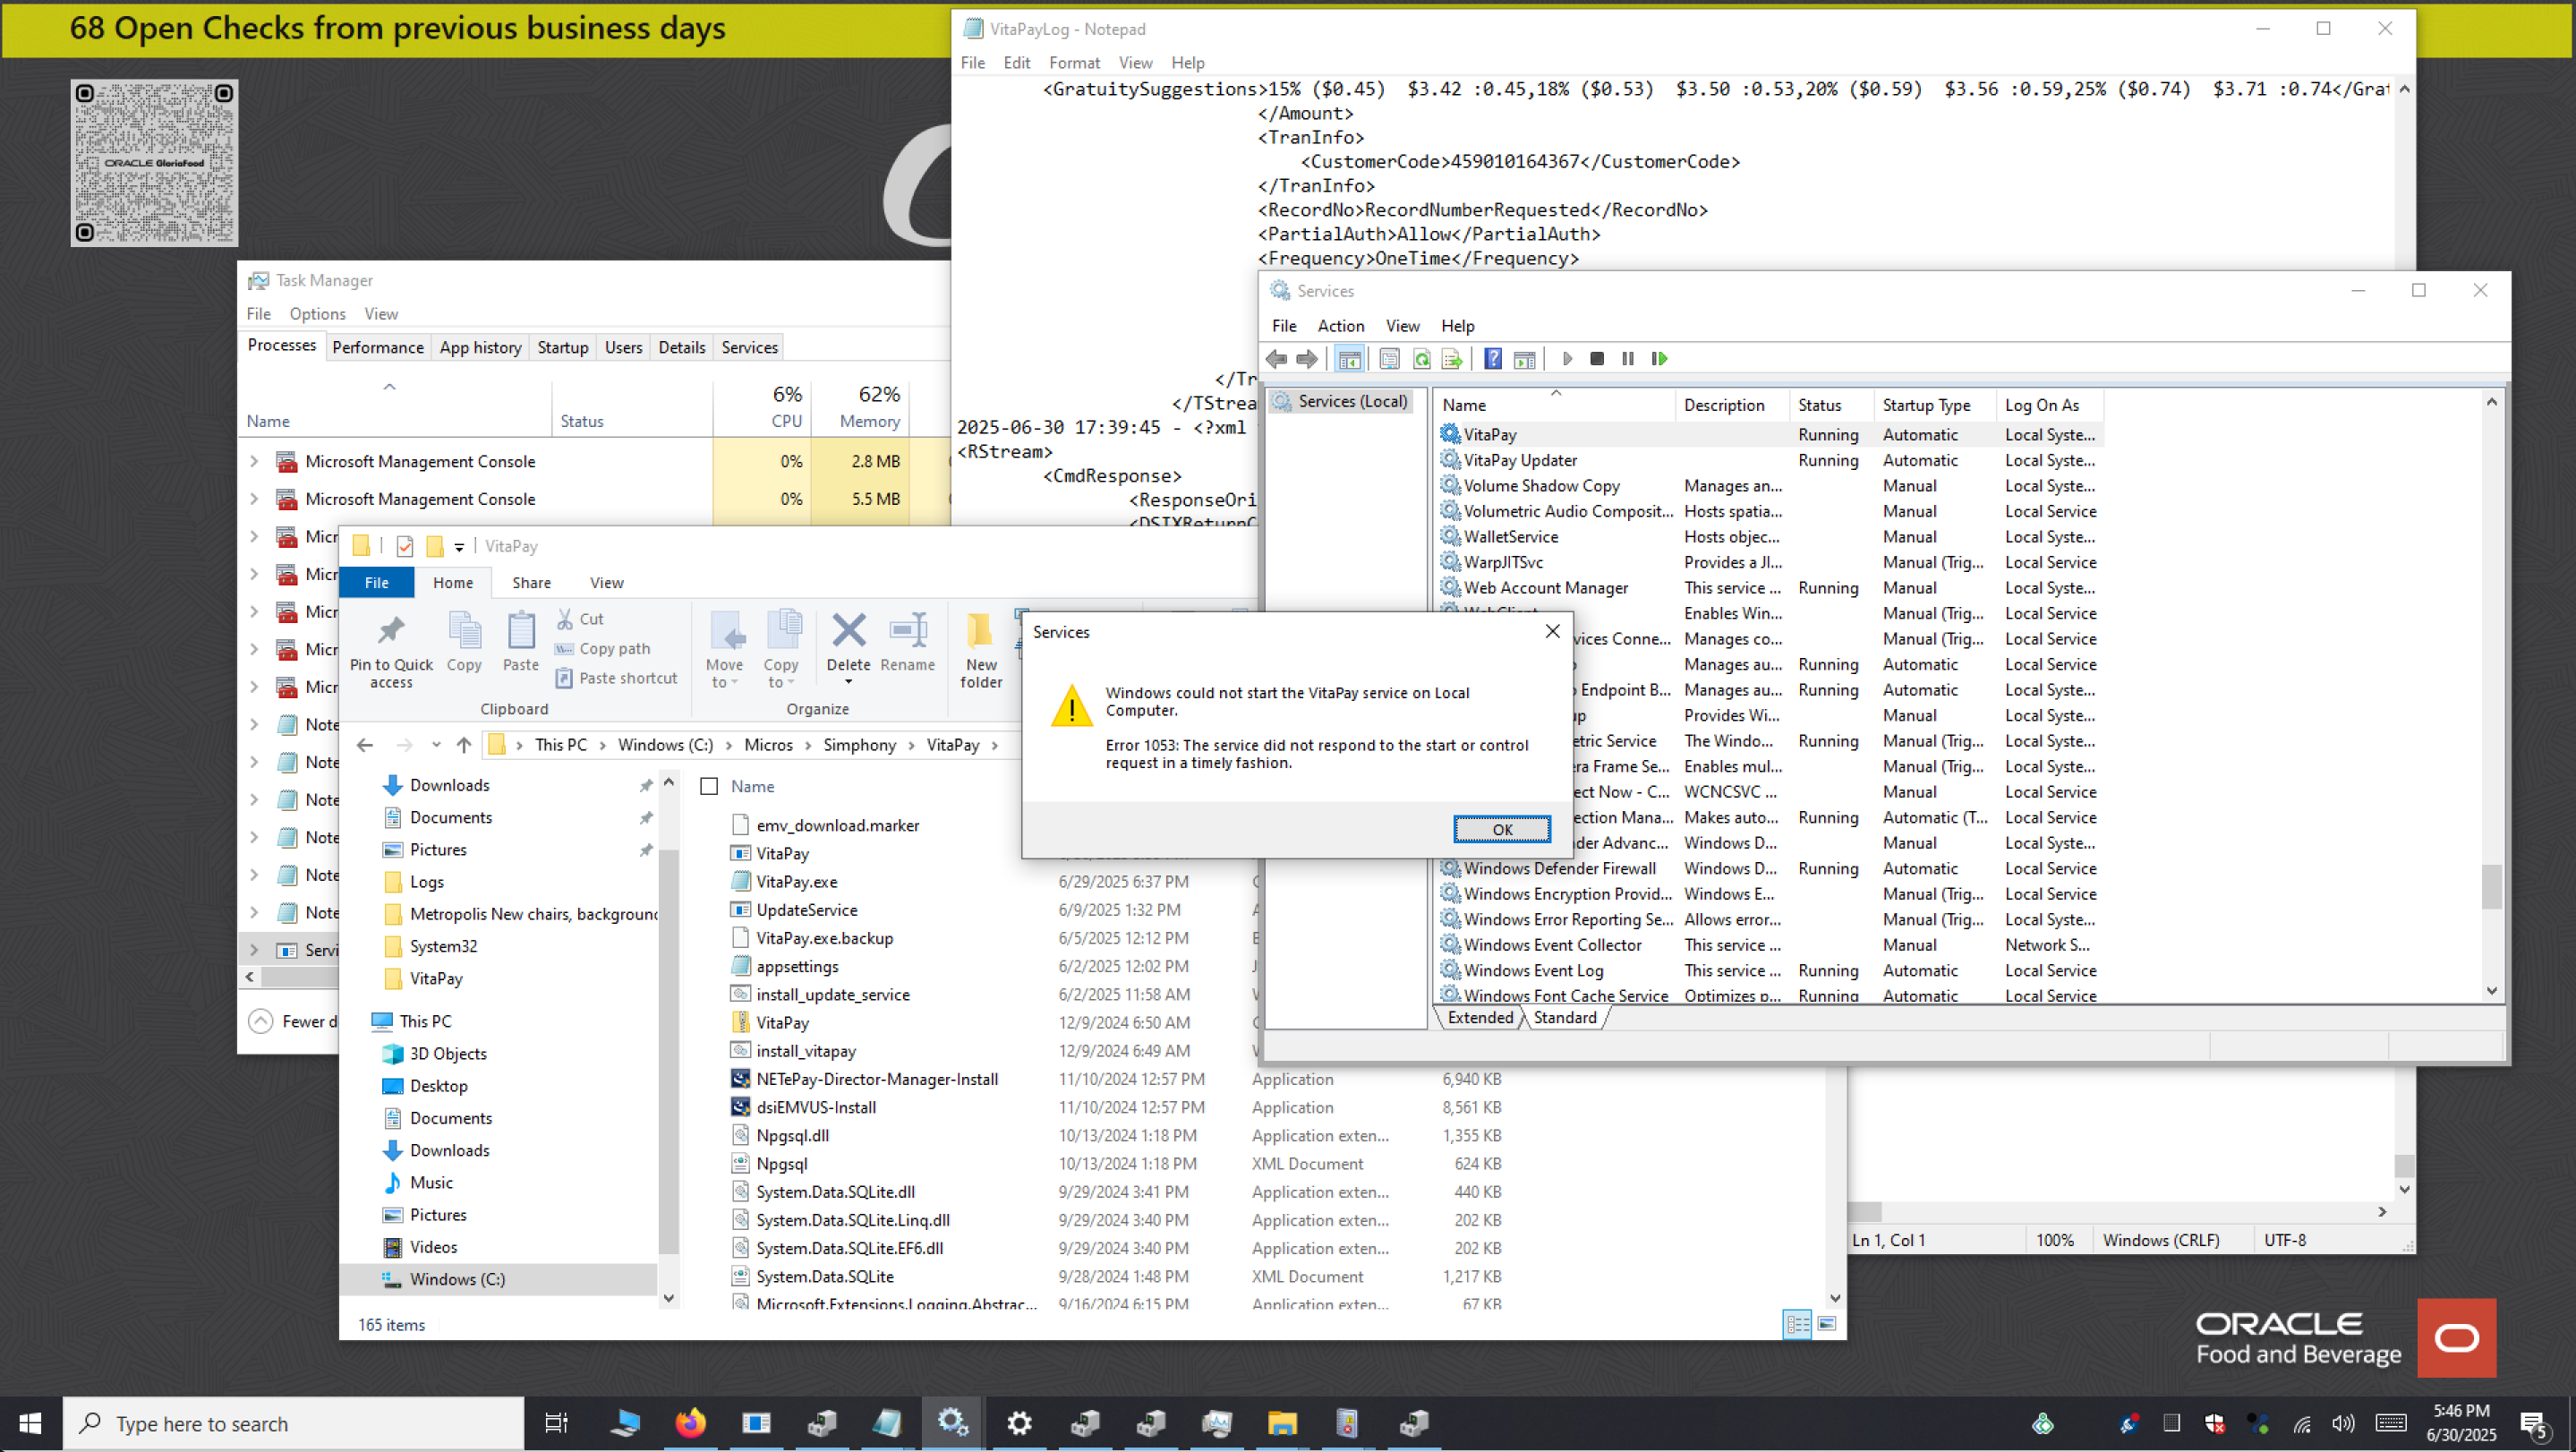
Filter Event Viewer to the VitaPay logs
Purpose: Set up Event Viewer on the workstation so it shows only the VitaPay and VitaPay Updater entries. This strips out unrelated Windows noise so you can read what the payment service did around the time of a failure.
When to use this: Set this up once on each workstation, before you need it. Almost every "service won't start" or timeout problem is explained by an entry here.
Set up the filter
- Press Windows + R, type
eventvwr.msc, and press Enter. - In the left pane, expand Windows Logs and click Application.
- In the right pane, click Filter Current Log....
- On the Filter tab, open the Event sources dropdown and tick the payment service's entries: the VitaPay payment service and the VitaPay Updater. Names can vary slightly by build, so match the VitaPay payment entry and the VitaPay Updater entry, the same two you see in the Services console.
- Click OK. The list now shows only those two sources.
[INSERT SCREENSHOT: Event Viewer Filter Current Log dialog with VitaPay and VitaPay Updater ticked under Event sources]
Keep it for next time
A filter clears when you close Event Viewer. To keep it:
- In the left pane, right-click Custom Views and choose Create Custom View....
- Set the same Event sources (VitaPay and VitaPay Updater) on the Filter tab.
- Click OK, name it
VitaPay, and save. It now lives under Custom Views and is one click away next time.
Sort the list by Date and Time and read the entries around when the problem happened. A failed start names the reason (for example, a config it couldn't load).
Verify
- The Application log (or your VitaPay custom view) shows only VitaPay and VitaPay Updater entries.
- You can scroll straight to the time a payment failed without passing unrelated Windows events.
See also
How IP reservations work
Purpose: Keep the device that acts as the reader at the same network address every time, so the counter and the reader never lose each other.
When to use this: Setting up or fixing Order & pay with a pinpad when the reader is a handheld in Mobile Terminal mode. That mode reaches the handheld by its IP address, so the address has to stay put.
Why it matters
Every device on the network gets an IP address from the router. By default that address can change when the device reconnects or its lease expires.
Mobile Terminal pins two addresses together:
- The workstation points at the handheld with Mobile Terminal IP.
- The handheld points back at the workstation with its Redirect target.
If either address changes, the pair breaks: a sale rung on the counter never prompts on the handheld, or it times out (and sometimes the card is charged while the check stays open). An IP reservation prevents that.
What an IP reservation is
An IP reservation (your router may call it a DHCP reservation, static lease, or bind IP to MAC) tells the router to always hand one specific device the same IP. The device still gets its address automatically, it's just always the same one. You tie the device's hardware address (its MAC) to a fixed IP.
This is done on the site's router, so it's typically handled by whoever manages the network. Have the reader's MAC address and current IP ready before you start.
Set one up
- Get the device's MAC address and current IP.
- Handheld: open the device's Settings → About / Status and read the Wi-Fi MAC and IP.
- Workstation: open a command prompt, run
ipconfig /all, and read the Physical Address (MAC) and IPv4 Address.
- Log into the site's router / gateway admin page.
- Find DHCP or LAN settings, then Address Reservation (wording varies by router).
- Add a reservation that ties the device's MAC to the IP you want it to keep.
- Save, then reboot the device so it picks up the reserved address.
Reserve both ends of a Mobile Terminal pair: the handheld and the workstation.
Tie it back to the settings
- The workstation's Mobile Terminal IP must equal the handheld's reserved IP.
- The handheld's Redirect target must equal the workstation's reserved IP.
See Workstation · Setting up Mobile Terminal and Handheld · Mobile Terminal mode for where those two values live.
Verify
- Reboot the handheld and the workstation, then confirm each still shows the same IP.
- Ring a small test sale on the counter: it prompts on the handheld. Approve, then void it.
- On the workstation dashboard, Service Stats still shows the handheld's address under MobileTerminalIP.
See also
- Order & pay with a pinpad (triage)
- Workstation · Setting up Mobile Terminal
- Handheld · Mobile Terminal mode
Triage: Order & pay with a pinpad
Purpose: Work the problems that hit the counter flow, where the order is rung on the till and the customer pays on a pinpad reader. The reader can be a fixed countertop one, or a handheld acting as the counter's reader in Mobile Terminal mode.
When to use this: You ring the order on the counter and the payment is taken on a reader attached to that counter.
If the reader is a handheld in Mobile Terminal mode, set up IP reservations before anything else: most of the issues below trace back to the reader's address changing. Have the VitaPay Event Viewer filter ready too.
Issues specific to this mode
Timeout: payment taken but the check doesn't close
What it means: The card was charged on the reader, but the approval didn't get back to the till in time, so the check stays open. On Mobile Terminal this almost always means the counter briefly lost the handheld (a network or address problem).
Fix:
- Don't re-run the card yet. The customer may already be charged. Confirm before doing anything that could double-charge them.
- Check whether the payment actually captured: in the cloud portal, open Transactions and look for the charge by card, amount, and time.
- If it captured: close the check to that tendered amount on the till without re-charging the card. The money is in, the check just needs to be settled.
- If it did not capture: re-run the payment on the reader as normal.
- Stop it happening again: confirm the handheld's IP reservation and that the workstation's Mobile Terminal IP still matches it (see Setting up Mobile Terminal). Confirm both are on the same network and the handheld isn't going to sleep.
- Read the VitaPay Event Viewer log around that time for the timeout entry, and use Upload Logs Now so support can see it.
Verify: A counter test sale prompts on the reader, approves, and the check closes on the till on its own.
The reader won't wake, "Timeout waiting for PinPad"
What it means: The customer didn't act in time, or the reader went to sleep.
Fix: Wake the reader and run the payment again. If it won't wake or keeps timing out, run EMV PAD RESET and restart the payment service, see Terminal & EMV management. If the reader is a handheld, also check it isn't on battery saver.
Issues that can happen in any mode
- Can't connect to reader, including "Failed on Com Port" / NAK on a counter reader.
- Reference transaction not found when voiding or adjusting an earlier sale.
- Services not starting: the counter can't take payment at all (and any Mobile Terminal handheld goes dead with it).
See also
- IP reservations
- Workstation · Setting up Mobile Terminal
- Workstation · Common errors
- Workstation · Terminal & EMV management
Triage: Order & pay with a handheld
Purpose: Work the problems that hit the default handheld flow, where a server takes the order and the payment on the same device. This is the app's Order & Pay mode.
When to use this: The handheld both rings the order and takes the card, with no separate counter reader.
Keep the VitaPay Event Viewer filter ready on the workstation that the handheld reports through, in case you need to read service logs.
Issues specific to this mode
The app won't respond, or "Could not communicate with Payment Provider"
What it means: The payment app isn't running or lost its connection.
Fix: Reopen the app from the Vitabyte tile, or tap Back To POS and back in. If it persists, swipe away all open apps and relaunch. Full steps: Handheld · Common errors.
Payments cancel on their own
What it means: Usually low battery or a power-saving mode suspending the app.
Fix: Charge the device, turn off battery saver, and confirm the Merchant ID is set. See Handheld · Common errors.
Payments are slow
What it means: Weak or dropping Wi-Fi.
Fix: Move closer to the access point or get the device on a stronger network. See Handheld · Common errors.
Issues that can happen in any mode
- Can't connect to reader: the Connection Lost modal on the handheld's reader.
- Reference transaction not found when voiding or refunding an earlier sale.
- Services not starting on the workstation the device reports through.
See also
Triage: Pull & pay with a handheld
Purpose: Work the problems that hit pay-at-table, where a check is rung elsewhere and a server pulls it up on a handheld to pay at the table. In the app this is Checks mode.
When to use this: The handheld pulls up an already-open check and takes payment on it, rather than ringing the order.
In Checks mode the unlock gesture changes: long-press the faint "…" in the bottom-left corner instead of swipe-swipe-tap. See the gesture page.
Issues specific to this mode
No checks are loading
What it means: The device is in Checks mode but the open-checks list is empty or won't fill. Usually the revenue center is wrong, a server filter is hiding them, or the device lost its link to the point-of-sale.
Fix:
- Open Device Settings (long-press the "…" bottom-left) and confirm Checks RVC # matches the revenue center the checks are rung under. See Pay-at-table mode.
- If a server sees none of the checks, check My Checks Only and turn it OFF to show every open check for that revenue center.
- If checks from more than one revenue center should appear, confirm they're listed under Checks Revenue Centers (in order) and that you tapped Save Revenue Centers.
- Tap Reload, then Back To POS, and reopen Checks.
- If the list is still empty, confirm the checks are actually open on the point-of-sale for that revenue center, and that the device is on the network and bound to the right workstation. See Setup & workstation binding.
- Still stuck: send the device logs with Upload SAF / Upload Logs and check the workstation's VitaPay log.
Verify: Open checks for the configured revenue center appear, and one can be pulled up and paid, ending in Transaction Approved!.
Issues that can happen in any mode
- Can't connect to reader: the Connection Lost modal on the handheld's reader.
- Reference transaction not found when voiding or refunding a check payment.
- Services not starting on the workstation the device reports through.
See also
Which mode am I using?
Purpose: Figure out how this site takes payments so you can jump to the right triage.
When to use this: You're troubleshooting but you're not sure which mode of operation this site runs.
Answer one question: where is the payment taken?
| What you see | Mode | Triage |
|---|---|---|
| Order is rung on a counter till, customer pays on a separate reader at that counter | Order & pay with a pinpad | Go |
| The same handheld rings the order and takes the card | Order & pay with a handheld | Go |
| The check is already rung, a server pulls it up on a handheld to pay at the table | Pull & pay with a handheld | Go |
Check it on the handheld
If a handheld is involved and you still aren't sure, read its settings:
- Open Device Settings with the unlock gesture (in Checks mode, long-press the "…" bottom-left).
- Look at these:
- Mobile Redirect is ON with a target IP: the handheld is acting as a counter reader, that's Order & pay with a pinpad.
- Checks mode is ON: that's Pull & pay with a handheld.
- Neither is on: it's the default Order & pay with a handheld.
See Modes of operation for what each mode does.
Still not sure
Start with the issues that can happen in any mode, and set up the VitaPay Event Viewer filter so you can see what the service logged while you narrow it down.
See also
Triage: issues that can happen in any mode
Purpose: Fix the problems that show up no matter how the site takes payment.
When to use this: You've landed here from a mode page, or the problem doesn't seem tied to one mode.
Can't connect to reader
What it means: The reader isn't talking to the device or PC that drives it.
Fix depends on where the reader is:
- On a handheld (Order & pay or Pull & pay on a handheld): work the Connection Lost modal in order, Retry, then Restart App, then reboot the device. If the reader still won't pick up cards, open Device Settings and run Init EMV or EMV Pad Reset. Full steps: Handheld · Reader & EMV management.
- On a counter reader ("Failed on Com Port" / NAK): the reader has fully lost its connection, so a soft reset won't help. Power-cycle it. A one-cable reader (Verifone P400) just needs unplugging and replugging; an externally powered reader (Verifone M400) needs both its power and USB disconnected, then reconnected. Restart the payment service once it comes back. Full steps: Workstation · Terminal & EMV management.
- On a handheld acting as the counter's reader (Mobile Terminal): also confirm the IP reservation and that the workstation's Mobile Terminal IP still matches the handheld.
Reference transaction not found
What it means: A follow-up action (void, adjust, capture, or completing a tip) can't find the original sale it's pointed at. This is a sharing problem between stations. Each station keeps its own copy of the sales taken on it, and stations share those with each other through the site's central server (CAPS). If a station can't reach CAPS, or the stations aren't sharing authorizations properly, a station can only see its own sales, so an action aimed at a sale that started on another station comes back "reference transaction not found."
Temporary fix: Run the action on the same station that took the original sale. That station has the original stored locally, so the void, adjust, or tip completes there even while sharing is down.
Fix the cause so any station can do it:
- Confirm the station is connected to the site's central server (CAPS). On a workstation, the CAPS address is set in its config, see Cloud · Provisioning configs; on a handheld, the bound CAPS address shows at the top of Device Settings.
- Make sure the site's CAPS Server machine is on and reachable on the network. That's the one PC with the CAPS Server box ticked, see Install & reinstall.
- Once the station can reach CAPS again, the shared sales are visible from any station and the action works from anywhere.
If it still isn't found anywhere: the original may never have captured. Confirm it in the cloud portal under Transactions; if it isn't there, treat it as a fresh sale and keep the logs.
Verify: The follow-up completes against the right original, either on the originating station now, or from any station once CAPS is reachable again.
Services not starting
What it means: The workstation payment service won't start or won't stay running, so the counter can't take payments (and any handheld pointed at it as a Mobile Terminal goes dead too).
Fix:
- Open the Services console (
services.msc). Find VitaPay and VitaPay Updater and Start (or Restart) them. See Workstation · Common errors. - If VitaPay starts then stops on its own: this is usually a hostname mismatch. The service binds its cloud config by the machine's hostname and won't start if they don't match. Confirm the hostname matches the config in the portal, see Install & reinstall and Cloud · Provisioning configs.
- Read the reason in the VitaPay Event Viewer log: a failed start names what it couldn't load.
- Confirm the gateway is up: a Socket Error 3006 means NETePay isn't running. See Workstation · Common errors.
- Still failing: send logs with Upload Logs Now and escalate.
Verify: Both VitaPay and VitaPay Updater show Running and stay running, and a counter test sale approves.
See also
- Technical Triage overview
- Error codes
- Filter Event Viewer to the VitaPay logs
- Workstation · Common errors
- Handheld · Common errors
Error codes
Purpose: Understand the decline codes you see, why the same decline can come back as a different number, and the codes that show up when you increment a virtual-wallet authorization.
When to use this: A payment came back declined with a numeric code and you want to know what it means and what to do next.
One platform, several processors
Vitabyte works across more than one card processor (a payment-facilitator, or payfac, model), for example WorldPay and TSYS. The processor behind a given transaction decides the exact code it returns, so the same underlying decline can come back as a different number depending on which processor handled it. The device shows which processor it's on in Device Settings.
Because of that, the codes are not always a clean one-to-one between processors. They follow a pattern rather than a fixed formula, and the app maps the common ones back to the same plain meaning.
The three-digit to two-digit pattern
Some processors (WorldPay) return a three-digit code, where a two-digit code carries the meaning the app normalizes to:
| You may see | Maps to | Means |
|---|---|---|
| 605 | 05 | Do not honor, a bank decline |
| 651 | 51 | Insufficient funds |
| 714 | 15 | No such issuer |
| 756 | 54 | Expired card |
So a 605 is an 05: the bank declined the sale. That can be for more than one reason, from incorrect incremental behavior on a running authorization to a plain bank do not honor. A 651 is a 51: the card doesn't have the funds.
The exact pairing depends on the processor, so not every three-digit code has a clean two-digit twin. When you hit one that isn't in the table, read the on-screen message, treat it as a decline, and use Upload Logs Now so support can confirm it.
Declines when incrementing a virtual wallet
662, 783, and 702 are declines that have shown up specifically when incrementing a virtual-wallet authorization (a tapped mobile wallet) on Mastercard, Discover, and Amex. Visa virtual wallets do work when incrementing.
The takeaway is operational, not about the exact number:
- Use a virtual wallet (tap) for final sales, where the amount won't change after it's authorized.
- For anything expected to increment or decrement, a bar tab, a preauth you'll top up, an amount you'll adjust, have the customer insert a physical card. A card insert is the reliable path for any transaction that will change after the first authorization.
This is the same class of problem as topping up a running tab. See Workstation · Declined while adding to a running tab.
The full table
The complete decline-code list, with the WorldPay and TSYS notes, lives on the common-errors pages:
- Workstation · Decline-code reference
- Handheld · Decline-code reference
- Manager quick reference (the everyday ones)
See also
Workstation
The Windows payment service that runs at the counter. It connects the till to a countertop card reader, takes payments, and reports them up to the cloud portal.
Start with whichever task you are here for.
Set up & maintain
- Install & reinstall: stand up a new counter, or repair one that stopped working.
- Daily procedures: the local config dashboard: reload settings, push offline transactions, upload logs.
- Setting up Mobile Terminal: point the counter at a handheld so the handheld acts as its reader.
- RVC routing for multi-MID sites: send different revenue centers to different merchant accounts on one PC.
Run & fix
- Terminal & EMV management: reset a reader, re-provision it, recover one that stopped communicating.
- Settings & configuration: tips, receipts, offline limits, and the other options that arrive from the cloud.
- Updater service: why a workstation isn't picking up a new version, the update window and the failure marker.
- Common errors: the messages you see on screen, what they mean, and the fix, plus the decline-code reference.
Reference
- Reference: supported readers and their secure-device profiles, and advanced support-only tools.
See also
Install & reinstall the workstation service
Purpose: Install the counter payment service from scratch, or reinstall it cleanly when a workstation has stopped taking payments.
When to use this: A new counter is being set up, or an existing one is broken and a clean reinstall is the fix. The reinstall steps below are the authoritative procedure, follow them in order.
This procedure ends with a note about EMV PARAM DOWNLOAD. If the workstation was already taking payments before you started, the reader already has what it needs. Do not press EMV PARAM DOWNLOAD during a reinstall, see Step 4.
Reinstall (the standard repair)
Step 1: Remove the existing services
Both payment services must be stopped and removed before you reinstall.
-
Open the Services console (
services.msc). -
Find the two payment entries, right-click each, and choose Stop. Match the VitaPay payment entry and the VitaPay Updater entry, the names can vary slightly by build (you may see VitaPay Service, VitaPayService, or VitaPayUpdater).
-
Confirm both show a blank Status (not Running) before going on.
-
Open Windows PowerShell as administrator (Run as administrator) and remove the two registrations, one at a time:
sc.exe delete "VitaPay"
sc.exe delete "VitaPay Updater"
Each command should return
[SC] DeleteService SUCCESS. You can keep the Services console open next to PowerShell and watch the entries disappear. -
Download the latest installer (ServiceInstaller.exe):
https://vitapayservice.s3.us-east-1.amazonaws.com/ServiceInstaller.exe
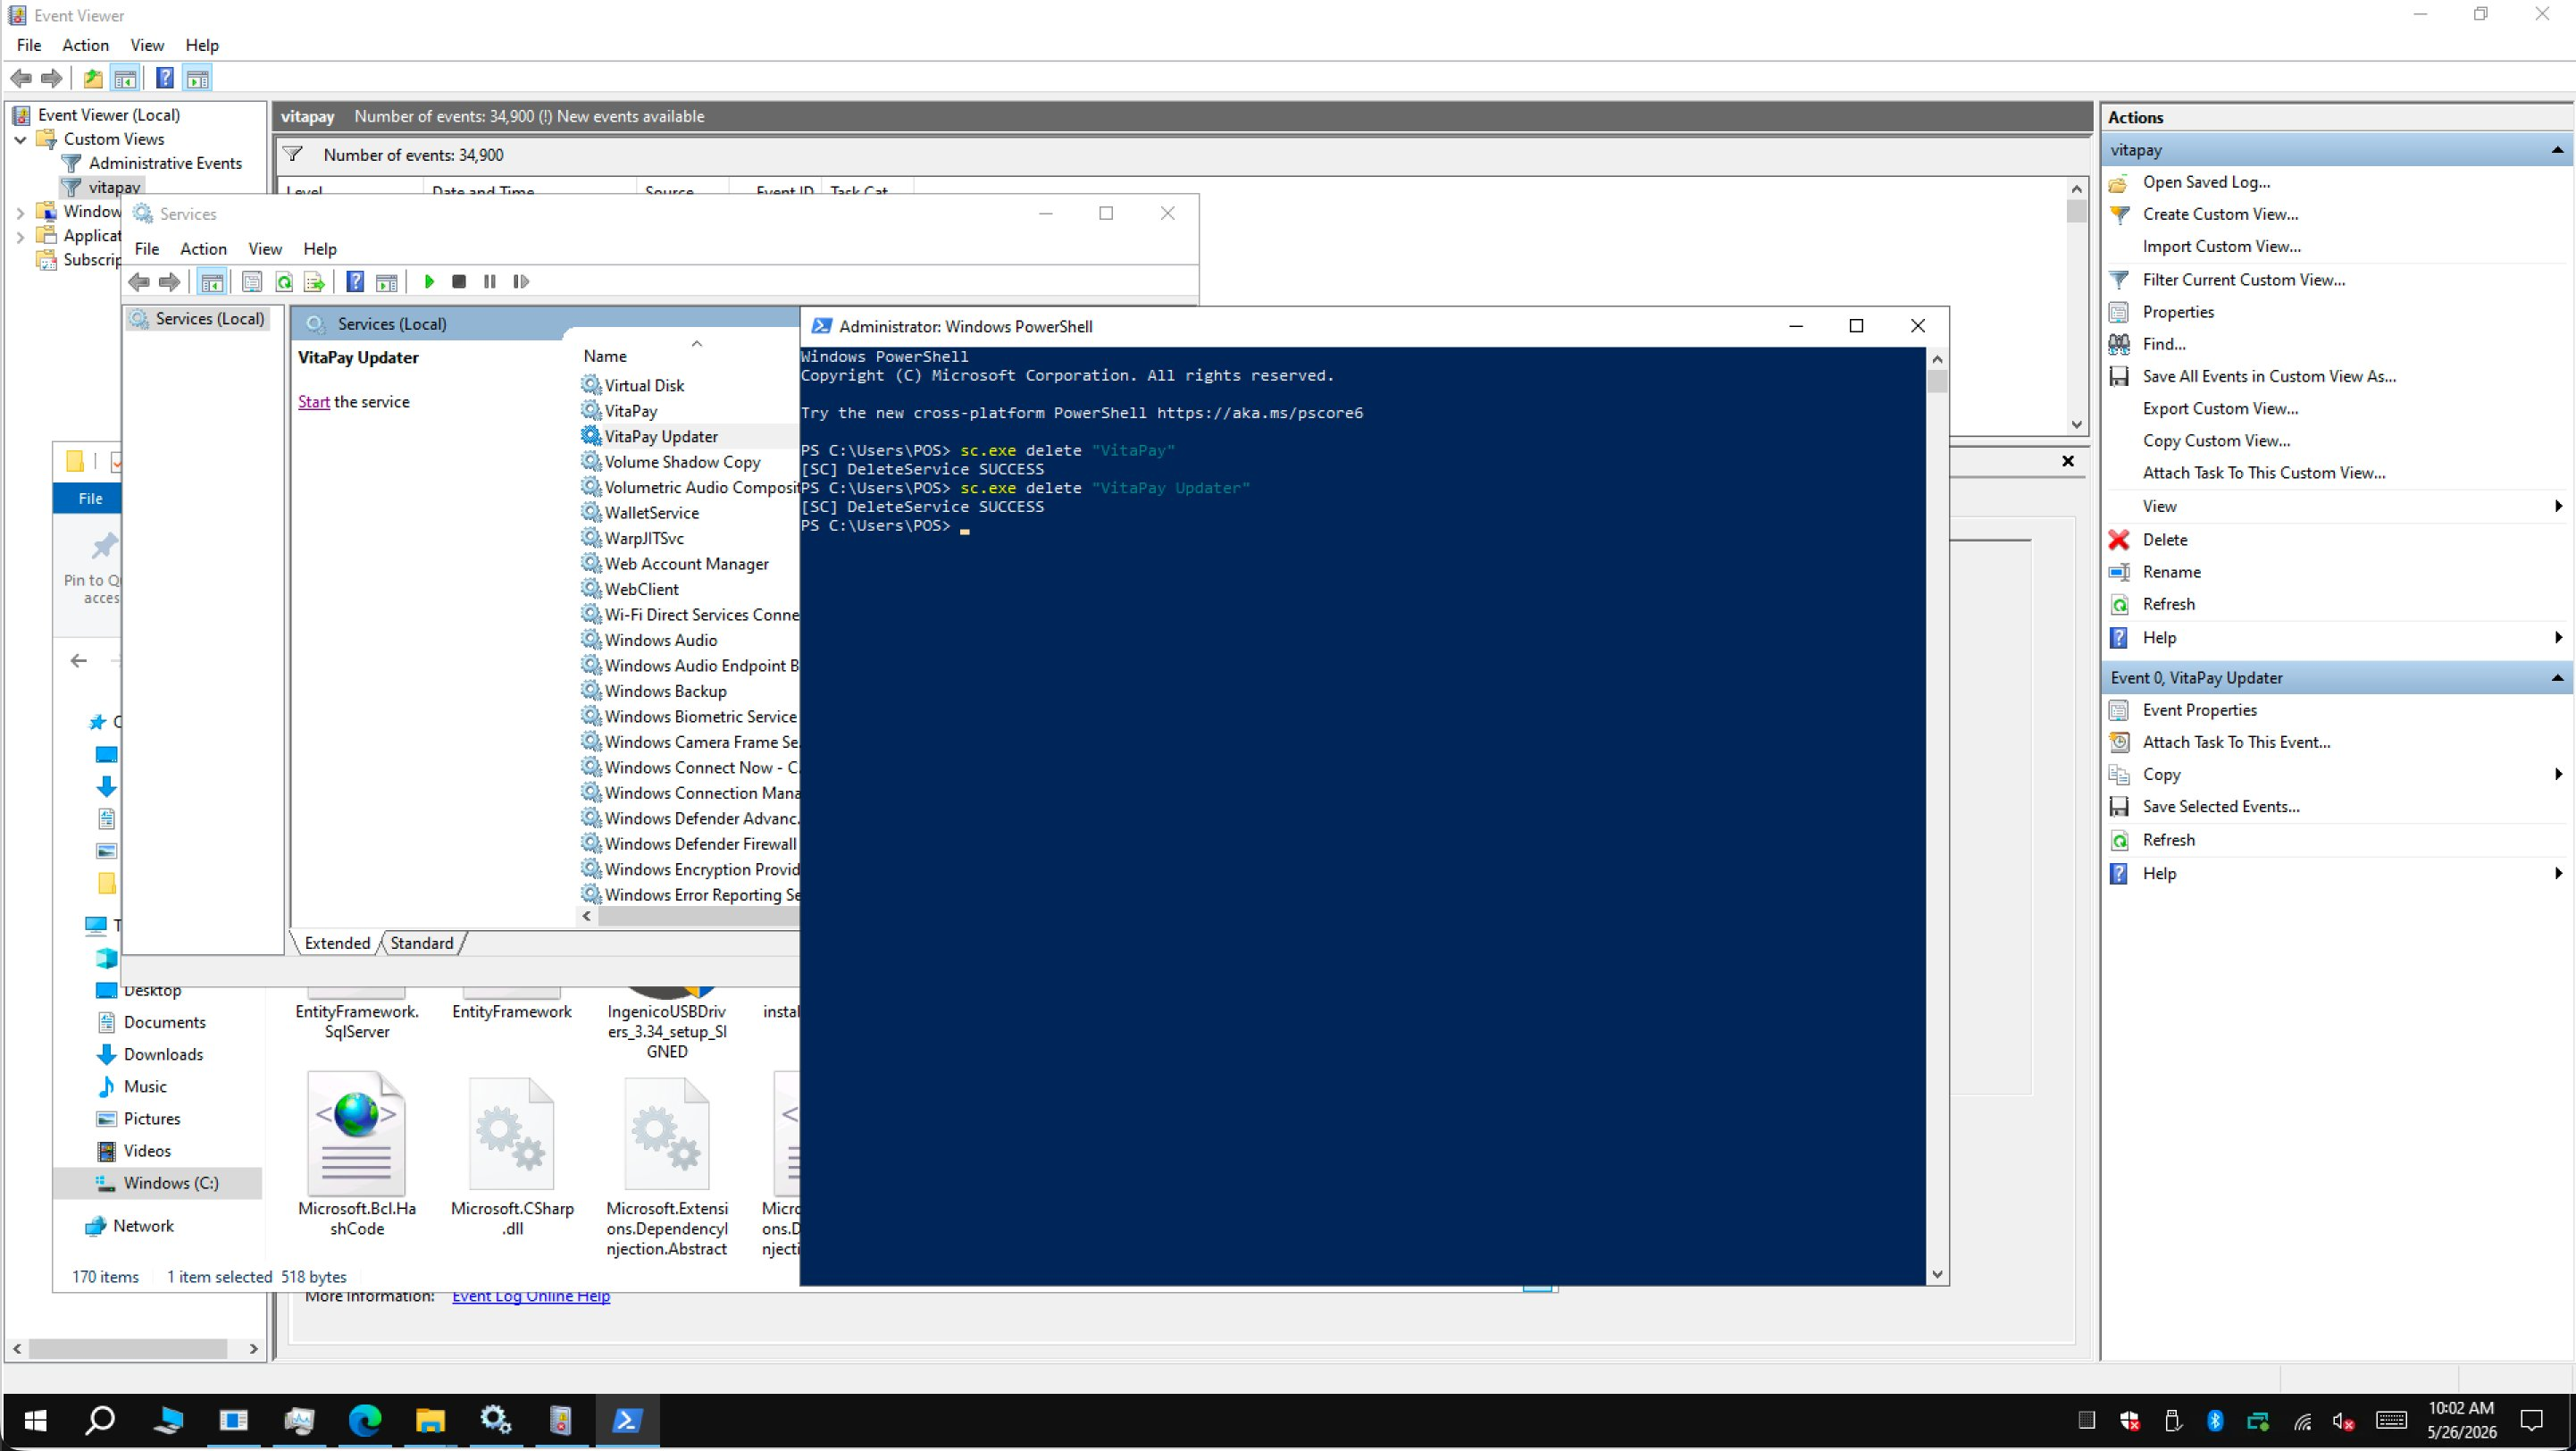 Stop both services in the Services console, then delete them with
 sc.exe delete in an elevated PowerShell.
Step 2: Run the installer and cancel the reader prompts
- Launch ServiceInstaller.exe from your Downloads folder.
- Enter the Merchant ID, click Start, then click Next through the prompts to let it run.
- The installer downloads its supporting components (USB drivers, configuration files), then tries to launch two sub-installers:
- dsiEMVUS (the card-reader middleware)
- NETePay Director and Manager (the payment gateway)
- Because both are already on the machine, Windows opens each on a Program Maintenance screen (Modify / Repair / Remove). You do not want to change them. Click Cancel on both the dsiEMVUS and the NETePay Director and Manager windows to dismiss them and let the install finish.
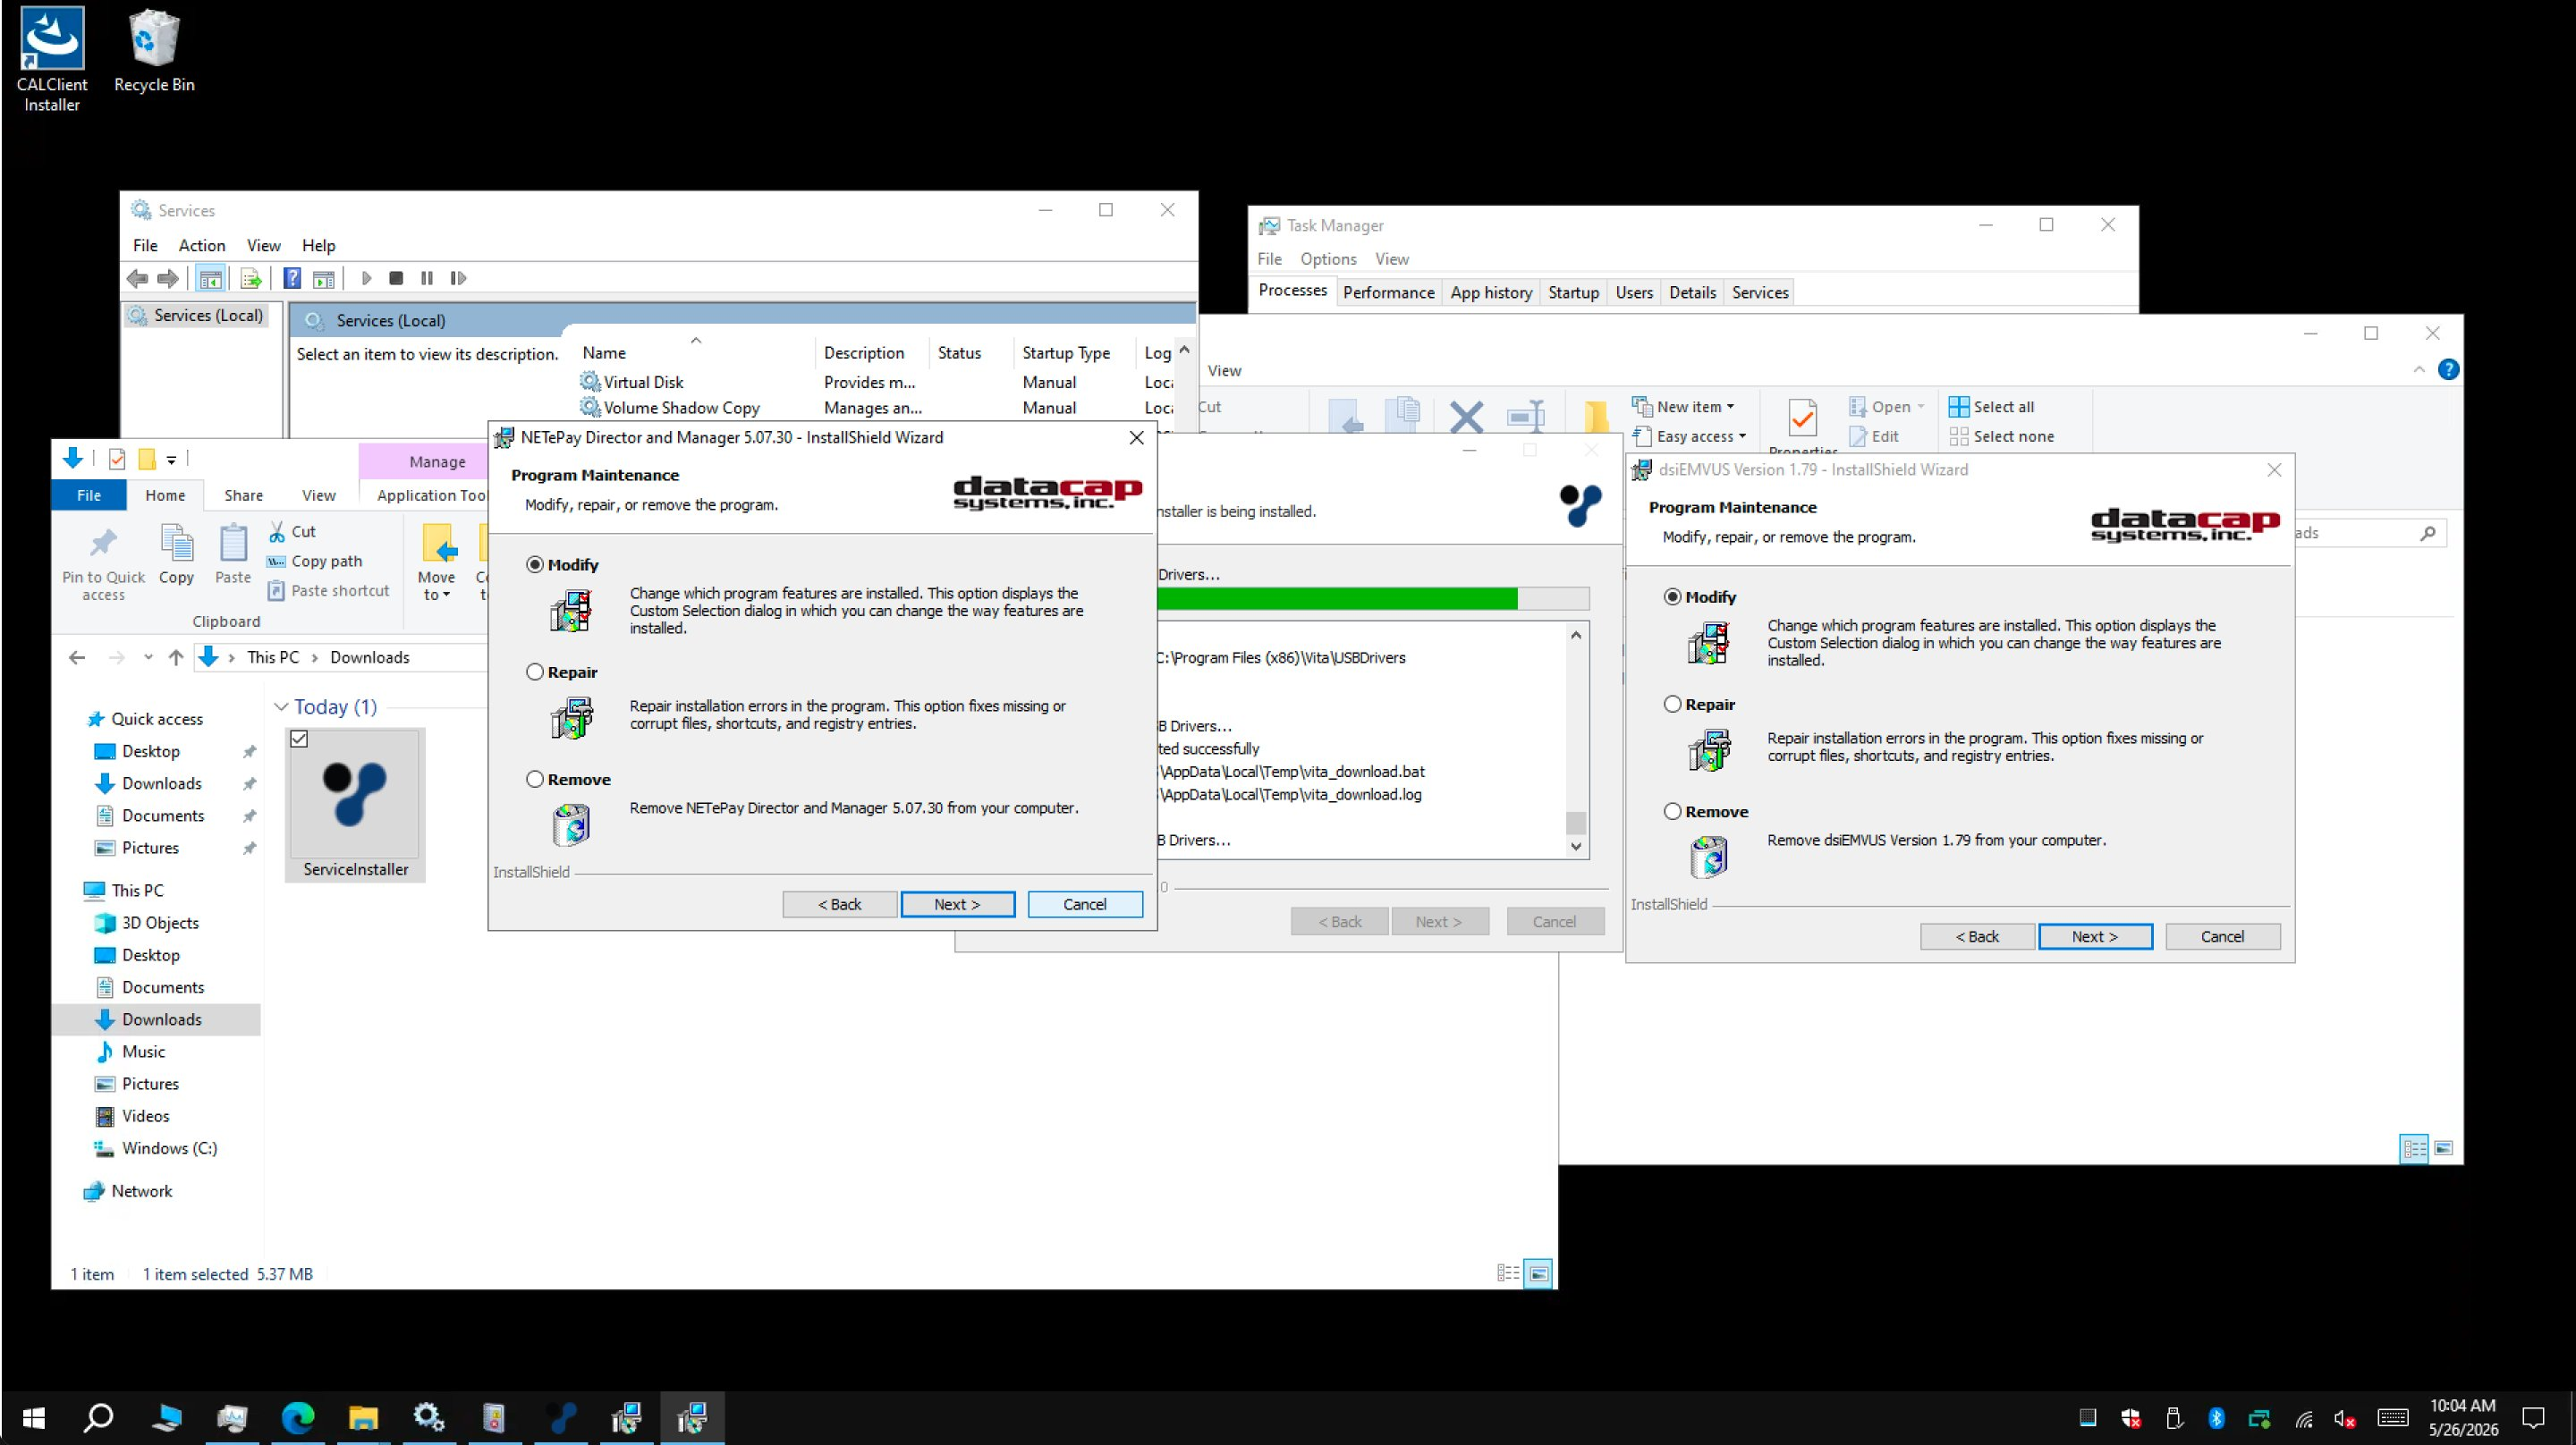 Click Cancel on both maintenance prompts, leave the existing reader and gateway installs untouched.
Step 3: Remove the legacy folder
The new installer puts the service in its current location. Clean up any leftover folder in the old path so configuration and logs don't end up split between two places.
-
Open the legacy install folder. On many machines it sits under the Oracle Simphony directory:
C:\Micros\Simphony\VitaPayYour exact path may differ depending on how the machine was originally set up.
-
Right-click the legacy VitaPay folder and choose Delete (or Shift+Delete to skip the Recycle Bin).
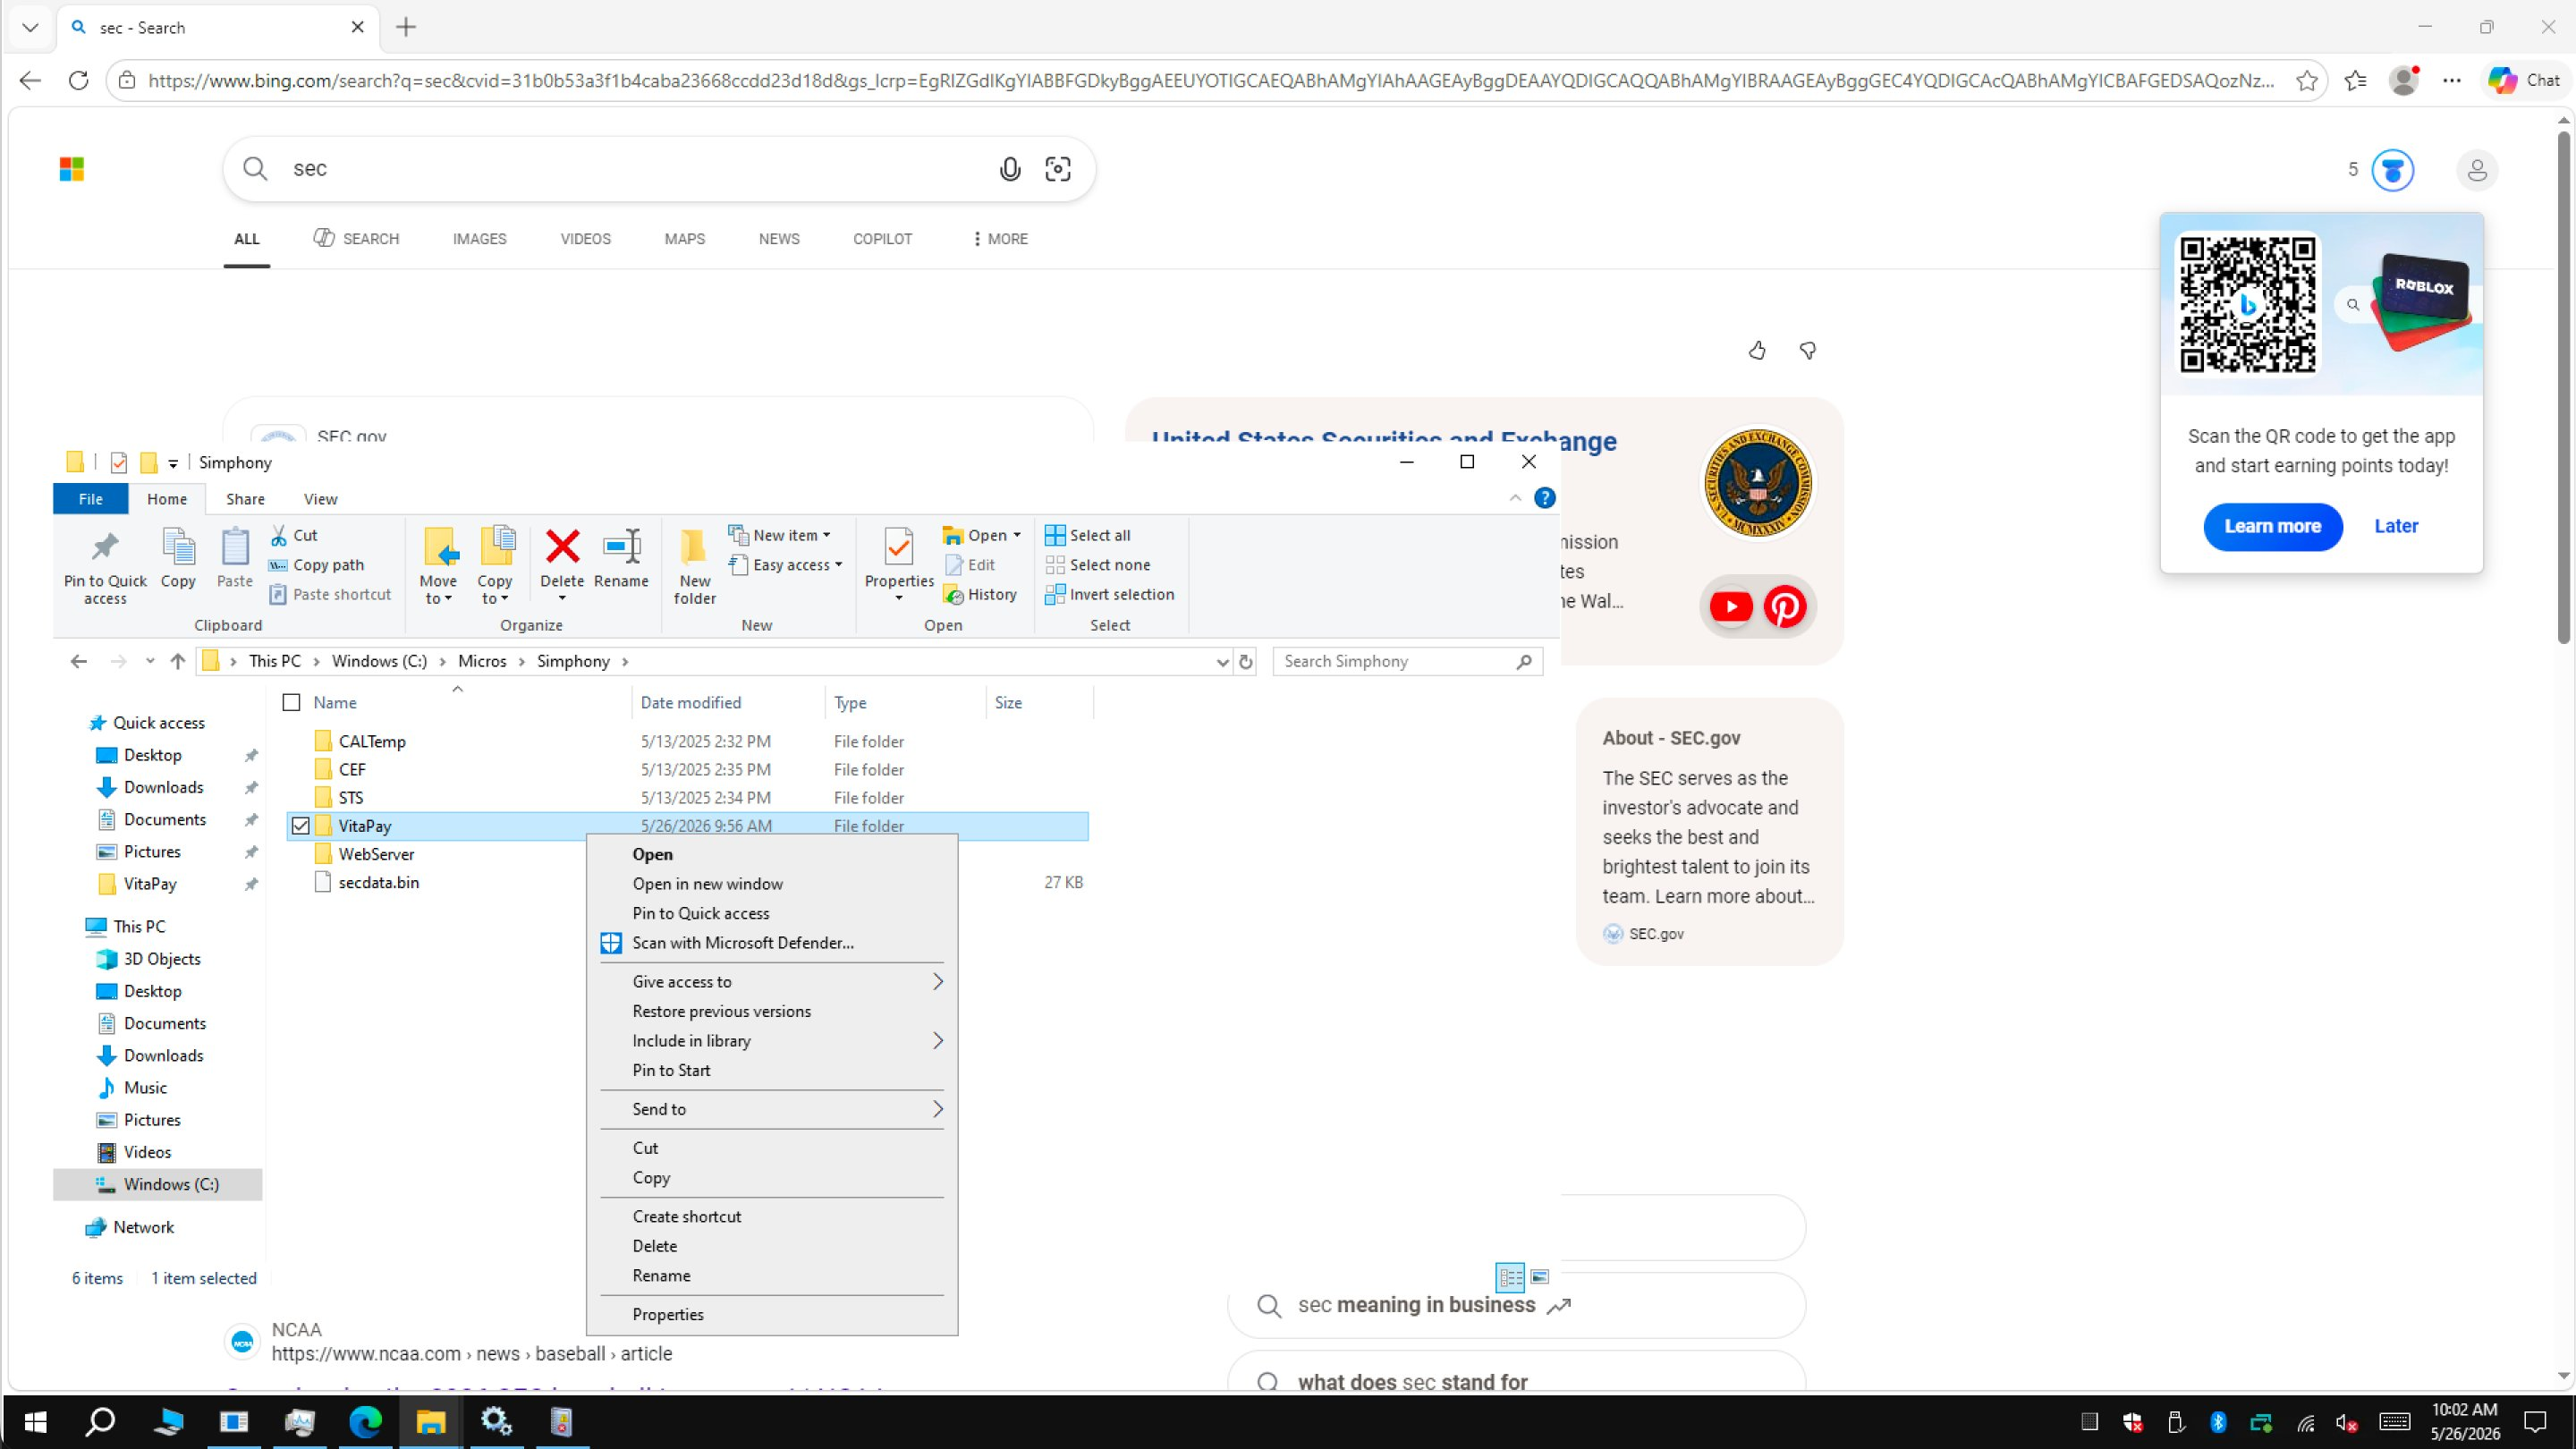 Remove the old folder so the workstation only references the new install.
Step 4: Start the services and verify
-
Start both services again, from the Services console (right-click → Start), or from an elevated PowerShell:
sc.exe start "VitaPay"
sc.exe start "VitaPay Updater" -
Confirm the install in either of two ways:
-
Event Viewer (
eventvwr.msc), the services should initialize without errors. -
The config dashboard: open a browser on the workstation and go to:
http://localhost:3036/api/dashYou should see the config dashboard with the Last Reload time, the SecureDevice (for example
EMV_P400_DATACAP_E2E), the EnableMobileTerminal status, and the action buttons (Reload Workstation Config, EMV PAD RESET, EMV PARAM DOWNLOAD, Check / Push Up Offline Transactions, Upload Logs Now).
-
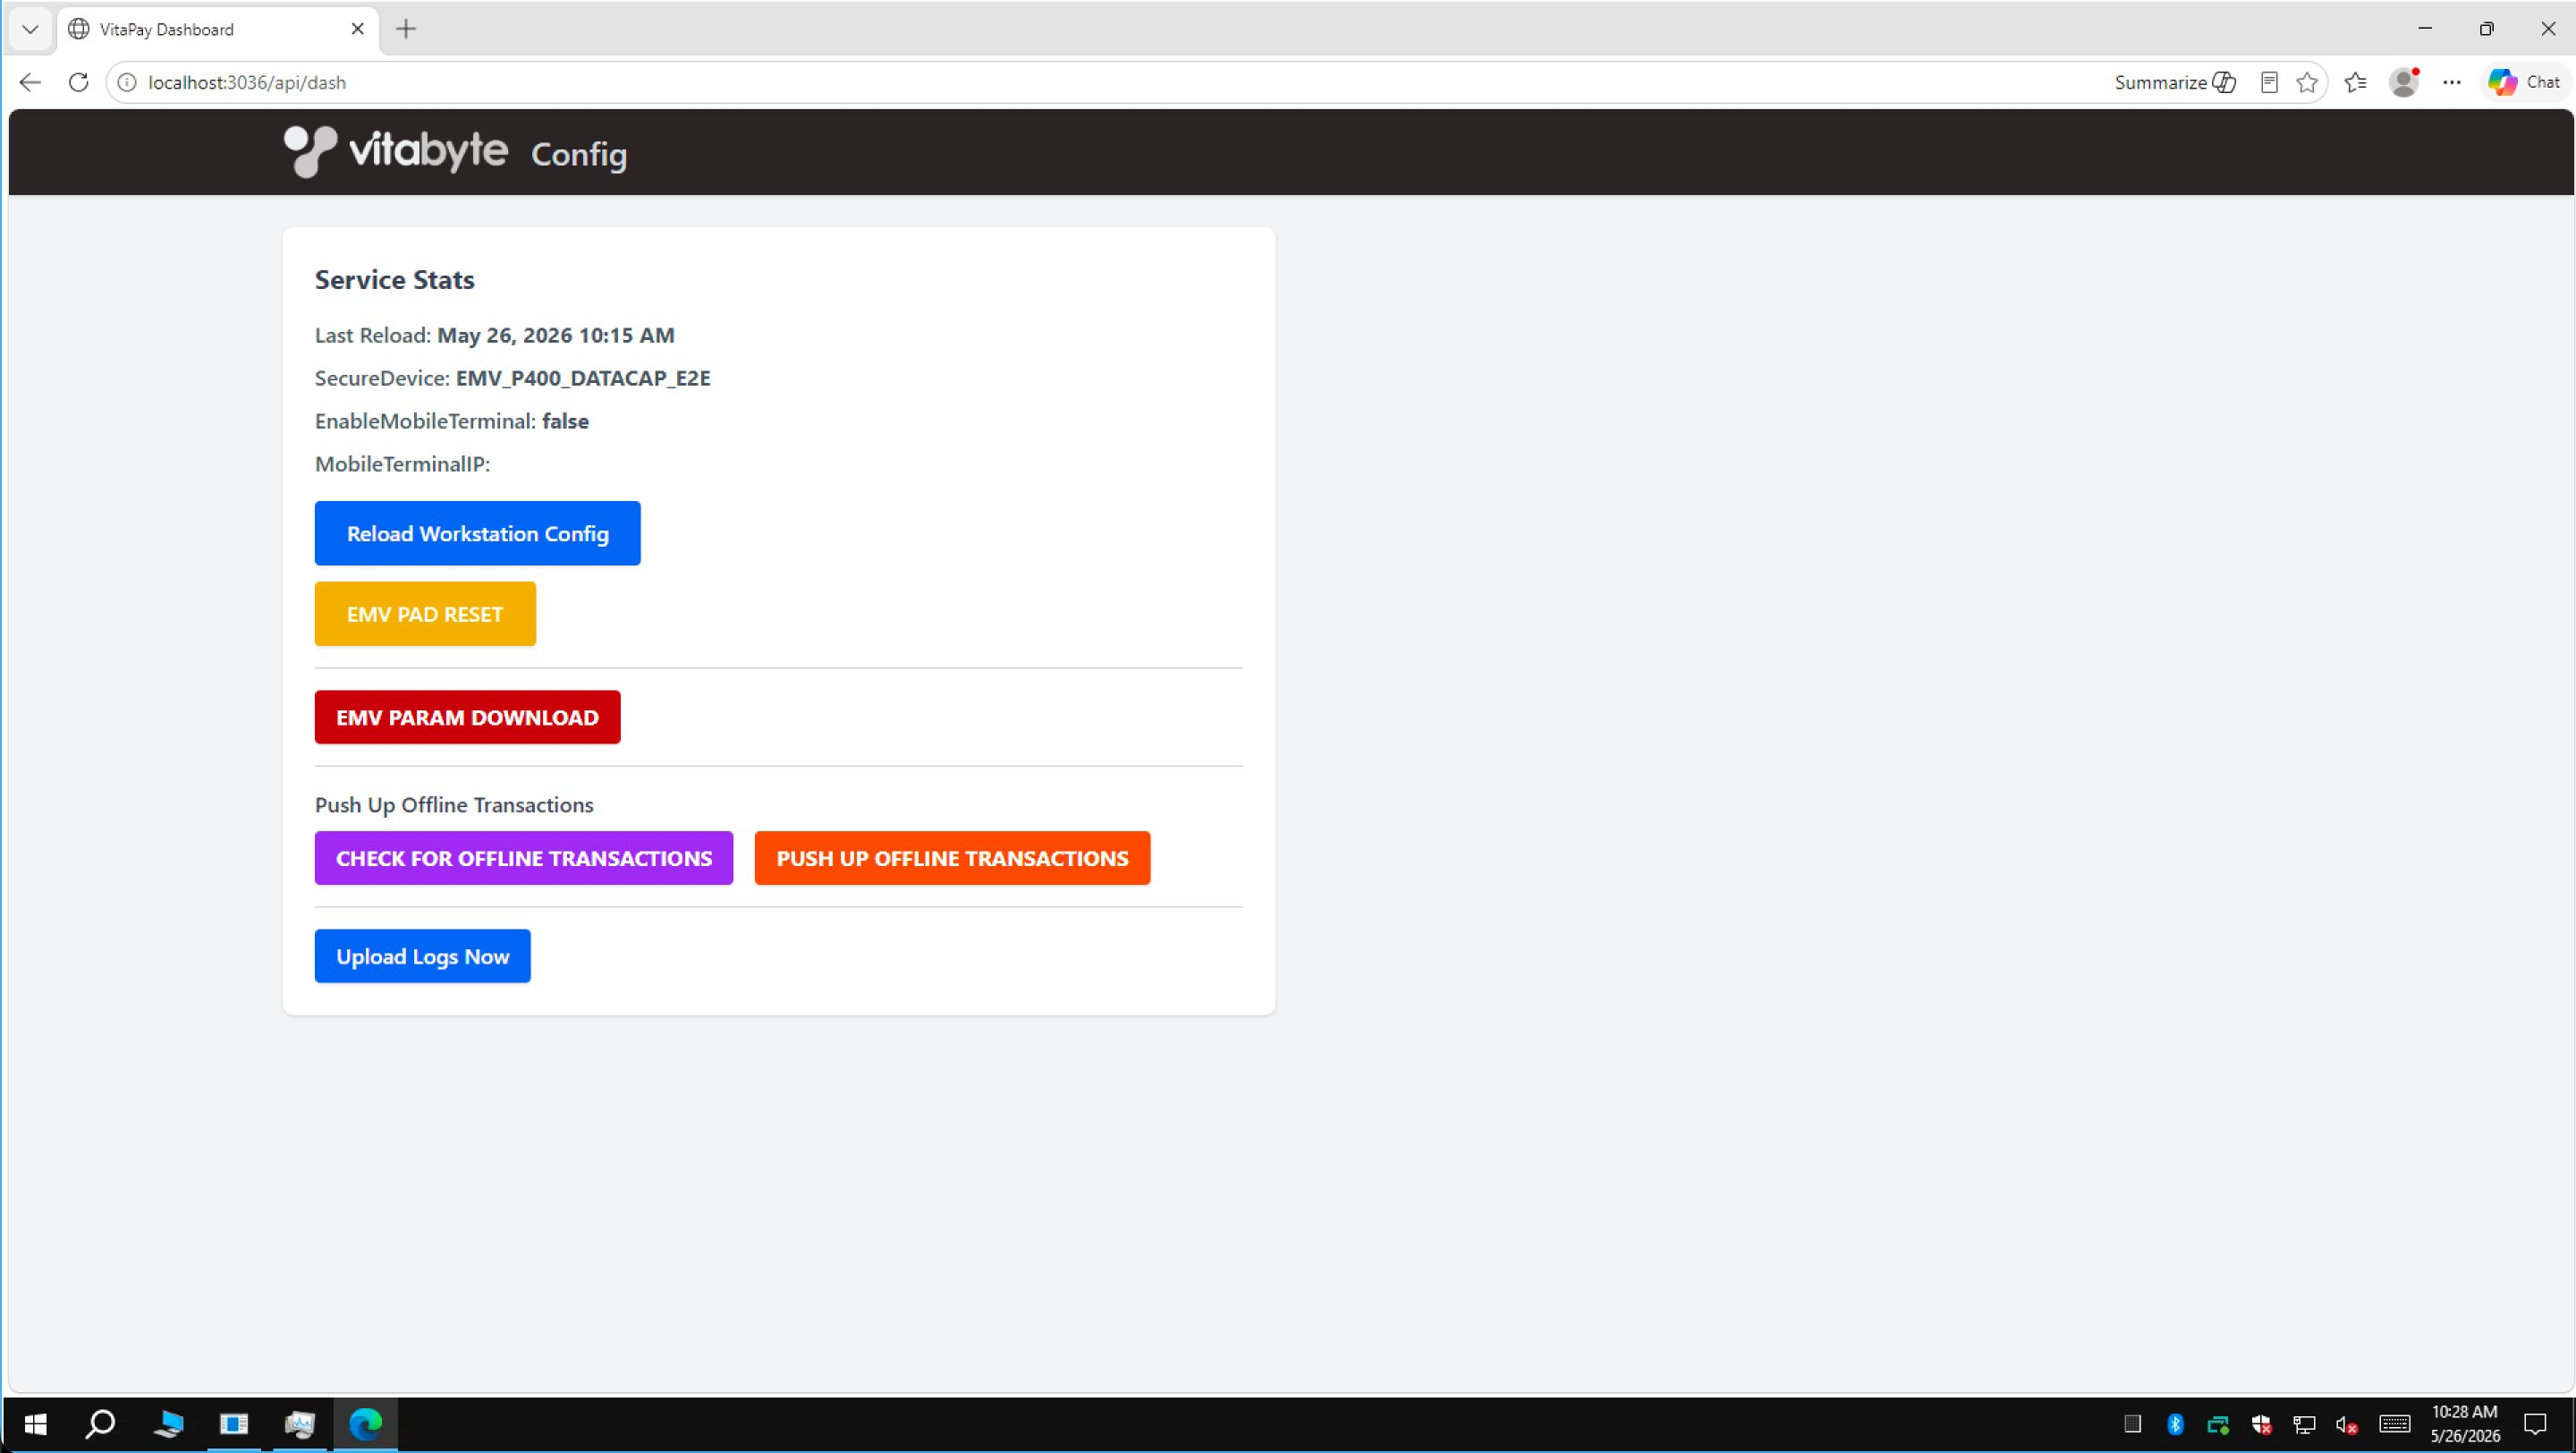 The dashboard at
 localhost:3036/api/dash confirms the service is up: Last Reload, SecureDevice, and the action buttons.
- If the reader is already rebooting on its own (the service is re-initializing it), don't press anything: let it finish.
- EMV PARAM DOWNLOAD is for new readers only. It pulls the merchant configuration onto a reader that doesn't have it yet.
- If this workstation was already taking payments before the reinstall, the reader already has its configuration, so do not press EMV PARAM DOWNLOAD. It is not needed for a reinstall.
First-time install
A brand-new machine uses the same installer with one extra decision:
- Run the launcher (VitaPayLauncher.exe).
- Enter the Merchant ID.
- Tick the CAPS Server box only if this PC is the site's central server (the one machine that holds the shared payment data for the location). Leave it unticked on every other PC.
- Continue the install, cancelling the dsiEMVUS and NETePay Director and Manager maintenance prompts exactly as in Step 2.
Verify
You'll know the install worked when:
- Both services show Running in the Services console.
- The dashboard at
http://localhost:3036/api/dashloads and shows a Last Reload time. - A small test sale on the terminal returns Approved, and you can Void it. After it, the dashboard's Last Reload should be recent.
The workstation pulls its config from the cloud by the machine's hostname. If the cloud config's Workstation Name doesn't match this machine's Windows hostname, the service can't find its config and won't start. Check the name in the portal, see Provisioning.
See also
- Daily procedures (config dashboard)
- Terminal & EMV management
- Common errors
- Cloud · Provisioning configs
Daily procedures: the config dashboard
Purpose: Use the local config dashboard to run the day-to-day jobs: reload a workstation's settings, push its offline transactions, reset a reader, and send logs to support.
When to use this: Any time you need to act on the workstation itself, after a settings change in the cloud, when offline transactions are waiting, or when support asks for logs.
Open the dashboard
On the workstation, open a browser and go to:
http://localhost:3036/api/dash
If you are remoted into the workstation, the same page works. The page is titled Config.
The config dashboard: Service Stats at the top, action buttons below.
Read the Service Stats
The top card, Service Stats, tells you the state of the workstation at a glance:
- Last Reload: when the workstation last pulled its config (or Never).
- SecureDevice: the reader profile in use, for example
EMV_P400_DATACAP_E2E. - EnableMobileTerminal: whether this workstation is pointed at a handheld.
- MobileTerminalIP: the handheld's address, if mobile terminal is on.
The actions
Reload Workstation Config
Press Reload Workstation Config to pull the latest settings from the cloud and apply them. The button shows Reloading…, then Reload Successful. Do this after anyone changes the workstation's config in the cloud portal, tip presets, secure device, mobile terminal, and the rest only take effect after a reload.
EMV PAD RESET
Press EMV PAD RESET for a quick, safe reset of the reader. It's the first thing to try when a reader stops responding. Full detail is in Terminal & EMV management.
EMV PARAM DOWNLOAD
EMV PARAM DOWNLOAD does a full re-provision of a reader, it pulls the merchant configuration onto it.
Use this only on a new reader, and only when the lane is idle. If the workstation is already taking payments, the reader already has its configuration, so you don't need it. Don't press it on a station mid-service.
Push up offline transactions
When the network drops, sales are stored on the workstation and forwarded later. To send them on demand:
- Press CHECK FOR OFFLINE TRANSACTIONS. The dashboard shows what's waiting, the MID, how many Requests to forward, any stored sale and return amounts, and the oldest/newest timestamps.
- If anything is waiting, press PUSH UP OFFLINE TRANSACTIONS to send them to the processor.
This is the workstation equivalent of the handheld's offline push.
Upload Logs Now
Press Upload Logs Now to send the workstation's logs to support. Use it when you're troubleshooting an issue or support asks for logs. The button confirms with Upload Successful.
Verify
- After Reload Workstation Config, the Last Reload time updates to the current time.
- After CHECK FOR OFFLINE TRANSACTIONS, Requests to forward reads
0once everything has been pushed.
See also
- Terminal & EMV management
- Settings & configuration
- Common errors
- Handheld · Push offline transactions
Setting up Mobile Terminal
Purpose: Point a counter workstation at a handheld so the handheld acts as the workstation's card reader. The order is rung on the counter; the customer taps or inserts on the handheld.
When to use this: When a counter needs to take payment on a mobile device instead of a fixed countertop reader, for example a bar, where the server carries the reader to the guest. This is one half of the setup; the other half is putting the handheld into Mobile Terminal mode.
What controls it
Two settings on the workstation's cloud config do the work:
- Enable Mobile Terminal: turns the feature on for this workstation.
- Mobile Terminal IP: the network address of the handheld that will act as the reader. The handheld listens on port 3036.
These live in the workstation's config in the cloud portal, not on the PC.
Steps
- Get the handheld onto the same network as the workstation, and note its IP address.
- In the cloud portal, open this workstation's config, see Provisioning configs.
- Turn on Enable Mobile Terminal.
- Set Mobile Terminal IP to the handheld's address (for example
192.168.1.52). Leave the port at 3036 unless told otherwise. - Save the config in the portal.
- On the workstation, open the dashboard at
http://localhost:3036/api/dashand press Reload Workstation Config. - On the handheld, put it into Mobile Terminal mode, see Handheld · Mobile Terminal mode.
[INSERT SCREENSHOT: cloud portal workstation config showing Enable Mobile Terminal and Mobile Terminal IP fields]
Verify
- On the dashboard, Service Stats shows EnableMobileTerminal: true and the handheld's address under MobileTerminalIP.
- Ring a small test sale on the counter, it should prompt for payment on the handheld. Approve, then void it.
Confirm the handheld is powered on, has the app open, is in Mobile Terminal mode, and is on the same network. A handheld that's off, asleep, or on a different network is the usual cause.
See also
- Handheld · Mobile Terminal mode
- Cloud · Provisioning configs
- Daily procedures (config dashboard)
- RVC routing for multi-MID sites
RVC routing for multi-MID deployments
Purpose: Run more than one merchant account from a single workstation, sending each revenue center's payments to the right account.
When to use this: A location has several revenue centers, say a restaurant and a bar, that settle to different Merchant IDs, but they share one counter PC. Routing makes sure each revenue center's payments go to its own account.
How it works
The point-of-sale sends a Merchant ID with each payment, based on the revenue center the check belongs to. The workstation looks at that Merchant ID and routes the payment to the matching account. Anything with no specific match falls back to the workstation's primary Merchant ID.
You don't manage this on the PC. The routing list lives in the workstation's cloud config, as a set of Alternative Routes, each one pairs a Merchant ID with the account it should use.
Steps
- Confirm which revenue centers exist and which Merchant ID each should settle to. Get the Merchant IDs from your contact if you don't have them.
- In the cloud portal, open this workstation's config, see Provisioning configs.
- Set the workstation's primary Merchant ID (the fallback).
- Add an Alternative Route for each additional revenue center: the Merchant ID it should use.
- Save the config.
- On the workstation, open
http://localhost:3036/api/dashand press Reload Workstation Config.
[INSERT SCREENSHOT: cloud portal Alternative Routes editor with two Merchant IDs configured]
Verify
- Ring a test sale in each revenue center and confirm in the cloud portal Transactions view that each landed under the correct Merchant ID.
See also
- Cloud · Provisioning configs
- Settings & configuration
- Daily procedures (config dashboard)
- Cloud · Transactions & reconciliation
Terminal & EMV management
Purpose: Reset a card reader, re-provision a new one, and recover a reader that has stopped communicating.
When to use this: A reader has gone quiet, throws Failed on Com Port or a NAK error, or you're bringing a brand-new reader online.
Two resets: know which one
The dashboard at http://localhost:3036/api/dash has two buttons. They are not the same.
| Button | What it does | When to use it |
|---|---|---|
| EMV PAD RESET | A quick, safe reset of the reader. Doesn't change its configuration. | Try this first when a reader is sluggish or stops responding. Safe during service. It won't recover a reader that has thrown a NAK, that needs a power cycle (see below). |
| EMV PARAM DOWNLOAD | A full re-provision, pulls the merchant configuration onto the reader. | Only for a new reader, and only when the lane is idle. |
Don't press EMV PARAM DOWNLOAD on a reader that's already working. It's for readers that don't yet have their configuration. On a station that's already taking payments, it isn't needed.
Recover a reader that stopped responding
If a reader is unresponsive or slow but hasn't thrown a hard communication error yet, start with the soft reset:
- Open the dashboard at
http://localhost:3036/api/dash. - Press EMV PAD RESET and wait for it to confirm.
- If it's still not communicating, restart the payment service: open the Services console (
services.msc), right-click the VitaPay entry, and choose Restart. - Watch the reader come back up and initialize.
 A reader that has stopped responding, start with EMV PAD RESET.
"Failed on Com Port" / NAK error
A NAK is usually the final error in a cascade: the reader has hit a series of errors and fully lost its connection to the PC. A soft reset won't bring it back at this point. The reader has to be physically power-cycled, and how you do that depends on how it's powered.
- One-cable readers (for example the Verifone P400): a single cable carries both power and data. Unplug it, wait a few seconds, and plug it back in.
- Externally powered readers (for example the Verifone M400): these draw power from a separate supply on top of the USB/data cable. Disconnect both the power and the USB/data cable, wait a few seconds, then reconnect both so the reader fully loses power and restarts. Reseating only the USB won't clear the NAK, because the reader never actually power-cycled.
Then:
- Wait for the reader to power back up and initialize.
- Restart the payment service (Services console, right-click VitaPay, Restart).
- Run a small test sale.
If it still NAKs after a full power cycle, the connection itself is suspect:
- Reseat the reader's USB cable into a known-good port.
- Open Device Manager and look under Universal Serial Bus controllers for any device showing an error; uninstall it and let Windows redetect on the next reconnect or restart.
 If a full power cycle doesn't clear the NAK, reseat the USB connection and check Device Manager.
Older notes mentioned deleting a "marker file" to refresh a reader. That method is retired. Use EMV PAD RESET (and EMV PARAM DOWNLOAD only for new readers) from the dashboard instead.
Verify
- The reader wakes and shows its idle/ready screen.
- A small test sale returns Approved; you can then Void it.
See also
- Daily procedures (config dashboard)
- Common errors
- Reference (supported readers & secure-device profiles)
- Install & reinstall
Settings & configuration
Purpose: Understand the options a workstation can carry, in plain terms, what each one does for the operator and the customer.
When to use this: When you're deciding how a counter should behave (tips, receipts, offline limits) or checking why it behaves the way it does.
You don't edit these on the PC. They're part of the workstation's config in the cloud portal. After any change, the workstation only picks it up when you press Reload Workstation Config on the dashboard.
Tips
- On-screen tip prompt. The reader asks the customer for a tip before they pay.
- Suggested tip presets. The percentages offered on screen (for example 15%, 18%, 20%, 25%). The reader shows each as a percentage with the dollar amount worked out for that sale.
Receipts & signature
- Signature line. When signatures are required, the line prints on the customer's receipt for them to sign.
- Short receipt. A minimal receipt that leaves off the tip and total lines, useful where a compact slip is preferred.
Offline limits
When the network drops, the workstation stores sales and forwards them later (see pushing offline transactions). Two limits keep that safe:
- How many offline transactions it will hold before it stops.
- How large any single offline transaction can be.
If a sale is over the per-transaction limit, it won't be taken offline, the network needs to be back first.
Reader & device
- Secure device. Which reader profile the workstation uses. This must match the actual reader model, see the device reference. The current profile is shown on the dashboard as SecureDevice.
- Mobile terminal. Whether this workstation uses a handheld as its reader, see Setting up Mobile Terminal.
- Routing. For sites with more than one merchant account on one PC, see RVC routing.
Verify
After changing settings in the cloud and pressing Reload Workstation Config, the dashboard's Last Reload updates and the new behavior takes effect on the next sale (for example, the new tip presets appear on the reader).
See also
- Cloud · Provisioning configs
- Daily procedures (config dashboard)
- Setting up Mobile Terminal
- Reference (secure-device profiles)
Updater service: when it isn't updating
Purpose: Fix the most common reasons the workstation's auto-updater (the VitaPay Updater) doesn't apply a new version.
When to use this: A workstation is stuck on an old version, or a new build hasn't rolled out to it.
The VitaPay Updater runs alongside the payment service and applies updates on its own. When it isn't updating, it's almost always one of the two reasons below.
1. The update window hasn't been reached
The updater only applies updates during a set time window, usually 4:00 AM to 6:00 AM local workstation time. Outside that window it leaves the workstation alone, by design, so an update never interrupts service.
What this means in practice:
- If the workstation was off, asleep, or offline during the window, it won't have updated. Leave it powered on and online overnight, then check again after the next window.
- The window is set at the merchant level and can be adjusted. To change it for a site, contact a Vitabyte admin. It isn't something you change on the workstation itself.
2. A failure marker is blocking updates
After an update fails, the updater writes a failure marker and then refuses to try again until that marker is cleared. This stops a single bad update from looping. If a workstation stopped updating right after a failed update, this is usually why.
Fix:
-
On the workstation, open the Vita program folder. The failure marker lives at:
C:\Program Files (x86)\Vita\failureYour base Vita folder may differ by install, but the failure marker sits under it.
-
Delete the failure marker.
-
Restart the VitaPay Updater service: open the Services console (
services.msc), right-click the VitaPay Updater entry, and choose Restart. Or simply wait for the next update window.
Only clear the failure marker when you intend to let the update run again. If the underlying update keeps failing, the marker will come back. Capture the workstation's logs with Upload Logs Now and escalate, rather than deleting it over and over.
Verify
- After the next update window (or a service restart), the failure marker doesn't reappear and the workstation moves onto the current build.
- If you're unsure which version a site should be on, confirm with a Vitabyte admin.
See also
- Install & reinstall
- Common errors
- Daily procedures (config dashboard)
- Filter Event Viewer to the VitaPay logs
Common errors: workstation
Purpose: Match the message on the screen to its cause and fix, and look up what a bank decline code means.
When to use this: A payment failed at the counter, or a reader or service threw an error. Find the message below.
Communication & gateway errors
"Could not communicate with Payment Provider"
What it means: The till can't reach the payment service on the PC.
Fix:
- Open the Services console (
services.msc) and confirm the VitaPay service is Running. If it isn't, right-click → Start (or Restart). - Confirm the point-of-sale's payment driver is pointed at port 3036.
- Retry the payment.
If the service won't stay running, see Install & reinstall, a hostname mismatch can stop it from starting.
"Socket Error … 3006"
What it means: The payment service reached the PC, but the payment gateway (NETePay) isn't running or isn't set up.
Fix: Make sure NETePay is running on the machine, then retry. If it was closed, reopen it; if it never opened, the gateway needs to be set up (see Install & reinstall).
"Timeout waiting for PinPad"
What it means: The customer didn't act on the reader in time, or the reader was asleep.
Fix: Wake the reader and run the payment again. If the reader won't wake, see Terminal & EMV management.
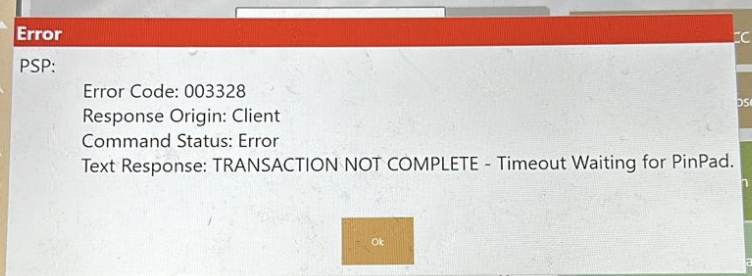 A timeout waiting for the reader, wake it and retry.
"Failed on Com Port" / NAK error
What it means: The reader has fully lost its connection to the PC. A NAK is usually the last error in a cascade, so by the time you see it, a soft reset (EMV PAD RESET) won't bring the reader back.
Fix: Physically power-cycle the reader, then restart the payment service.
- One-cable readers (for example the Verifone P400): unplug the single cable, wait a few seconds, and plug it back in.
- Externally powered readers (for example the Verifone M400): disconnect both the separate power and the USB/data cable, then reconnect both. The reader has to fully lose power, so reseating only the USB won't clear it.
Full steps are in Terminal & EMV management.
"Declined" or "parsing gateway error" while adding to a running tab
What it means: This shows up when you keep raising the authorization on an open tab through the night (common at a bar). The reader may answer with a declined error or a parsing gateway error even though the card is fine, the running authorization got into a state the gateway couldn't continue.
Fix: Stop topping up that authorization and run it again as a brand-new authorization on the same card. Treat it like a fresh tab. That clears it and lets service continue.
"Parsing gateway error" by itself means the gateway answered but the reply came back empty or garbled, often the connection dropped mid-reply. Retry once; if it keeps happening, check that NETePay is running and the network is stable, then use Upload Logs Now so support can see it.
"Reference transaction not found"
What it means: A follow-up (void, adjust, or completing a tip) can't find the original sale. Stations share their sales through the site's central server (CAPS), and each station can only see its own sales until they're shared. If this station can't reach CAPS, or the stations aren't sharing properly, a sale that started on another station looks missing.
Fix: As a quick workaround, run the action on the same station that took the original sale. To fix it for every station, get this station reconnected to CAPS (confirm the CAPS Server machine is on and the station's CAPS address is right). Full steps: Technical Triage · Reference transaction not found.
Where to look when you're stuck
- The message the point-of-sale shows on screen.
- The workstation's own logs, send them with Upload Logs Now on the dashboard.
- Event Viewer for service start-up problems (steps below).
Opening Event Viewer
- Press Windows + R, type
eventvwr.msc, and press Enter. - In the left pane, expand Custom Views and open the vitapay view if it's there. Otherwise open Windows Logs → Application.
- Sort by time and read the entries around when the problem happened. Service start-up failures and their reasons (for example a config it couldn't load) show up here.
Decline-code reference
When the bank declines a card, the reader shows a short numeric code. These come straight from the card issuer, they are not generated by us, and none here are invented. They tell you why the bank said no.
- TSYS returns the two-digit code directly, read it from the table below.
- WorldPay sometimes returns a three-digit code instead. The app translates the common ones to the same meanings: 605 → 05 (do not honor), 651 → 51 (insufficient funds), 714 → 15 (no such issuer), 756 → 54 (expired card). Everything else maps to the two-digit table below.
| Code | Meaning |
|---|---|
| 01 | Refer to issuer |
| 02 | Refer to issuer, special condition |
| 03 | Invalid merchant ID |
| 04 | Pick up card (no fraud) |
| 05 | Do not honor (bank decline, the most common) |
| 06 | General error |
| 07 | Pick up card, special condition (fraud) |
| 12 | Invalid transaction |
| 13 | Invalid amount |
| 14 | Invalid card number |
| 15 | No such issuer |
| 19 | Re-enter transaction |
| 21 | Unable to back out |
| 28 | File temporarily unavailable |
| 39 | No credit account |
| 41 | Lost card, pick up |
| 43 | Stolen card, pick up |
| 51 | Insufficient funds |
| 52 | No checking account |
| 53 | No savings account |
| 54 | Expired card |
| 55 | Incorrect PIN |
| 57 | Transaction not permitted, card |
| 58 | Transaction not permitted, terminal |
| 61 | Exceeds withdrawal limit |
| 62 | Invalid service code, restricted |
| 63 | Security violation |
| 65 | Activity limit exceeded |
| 75 | PIN tries exceeded |
| 79 | Already reversed at switch |
| 80 | Invalid date |
| 81 | Cryptographic error |
| 83 | Cannot verify PIN |
| 93 | Violation, cannot complete |
| 94 | Unable to locate, no match |
| 96 | System malfunction |
What to do with the common ones is on the manager quick reference. In short: 05, 51, and 54 mean try another card; 55 means re-enter the PIN; 14 means re-key the number.
See also
- Terminal & EMV management
- Daily procedures (config dashboard)
- Common POS errors (quick reference)
- Handheld · Common errors
Workstation reference
Purpose: Look up the supported readers and the exact secure-device profile each one uses, plus the advanced tools that are support-directed only.
When to use this: When you're setting the Secure Device for a workstation in the cloud and need the exact value, or when support asks you to use an advanced tool.
Supported countertop readers
The workstation works with Datacap-secured readers. The most common at the counter are the Verifone P400 and Verifone M400. The PAX A920 Pro is also used.
Secure Device profiles
The Secure Device value in a workstation's cloud config must match the reader model exactly, or the reader won't work. Use the value from this table. Lead choices are at the top.
| Reader | Secure Device value |
|---|---|
| Verifone P400 | EMV_P400_DATACAP_E2E |
| Verifone M400 | EMV_M400_DATACAP_E2E |
| Verifone P200 | EMV_P200_DATACAP_E2E |
| PAX A920 Pro | EMV_A920PRO_DATACAP_E2E |
| PAX A77 | EMV_A77_DATACAP_E2E |
| PAX A30 | EMV_A30_DATACAP_E2E |
| PAX A3700 | EMV_A3700_DATACAP_E2E |
| PAX A6650 | EMV_A6650_DATACAP_E2E |
| PAX Aries6 | EMV_ARIES6_DATACAP_E2E |
| PAX Aries8 | EMV_ARIES8_DATACAP_E2E |
| PAX IM30 | EMV_IM30_DATACAP_E2E |
| IDTech VP3300 | EMV_VP3300_DATACAP |
| IDTech VP3350 | EMV_VP3350_DATACAP_E2E |
| Ingenico Lane 3000 | EMV_LANE3000_DATACAP_E2E |
| Ingenico Lane 3600 | EMV_LANE3600_DATACAP_E2E |
| Ingenico Lane 5000 | EMV_LANE5000_DATACAP_E2E |
| Ingenico Lane 7000 | EMV_LANE7000_DATACAP_E2E |
| Ingenico Lane 8000 | EMV_LANE8000_DATACAP_E2E |
| Ingenico Link 2500 | EMV_LINK2500_DATACAP_E2E |
| Ingenico Move 3500 | EMV_MOVE3500_DATACAP_E2E |
| Ingenico Move 5000 | EMV_MOVE5000_DATACAP_E2E |
| Ingenico Self 3000 | EMV_SELF3000_DATACAP_E2E |
| Ingenico iCMP | EMV_ICMP_DATACAP_E2E |
| Ingenico iPP320 | EMV_IPP320_DATACAP_E2E |
| Ingenico iPP350 | EMV_IPP350_DATACAP_E2E |
| Ingenico iSC250 | EMV_ISC250_DATACAP_E2E |
| Ingenico iSC480 | EMV_ISC480_DATACAP_E2E |
| Ingenico iSMP4 | EMV_ISMP4_DATACAP_E2E |
| Ingenico iUC285 | EMV_IUC285_DATACAP_E2E |
| Ingenico iUP250 | EMV_IUP250_DATACAP_E2E |
| Ingenico iWL258 | EMV_IWL258_DATACAP_E2E |
Some sites run readers in a P2PE program. Those use the same value with _BLUEFIN in place of _E2E (for example EMV_P400_DATACAP_BLUEFIN). Use the P2PE value only when the site is set up for it.
Advanced tools (support-directed only)
The workstation has a separate admin page reached by typing its address into the browser. It holds destructive actions, clearing logs, clearing the workstation's local data, clearing the cloud cache, and resetting the workstation's stored data.
These actions can't be undone and will wipe stored transactions and local state. Only use the admin page when support walks you through it for a specific reason. For everyday work, the config dashboard has everything you need.
See also
- Cloud · Provisioning configs
- Settings & configuration
- Terminal & EMV management
- Handheld · Reference
Handheld
The handheld payment app. It can take orders and payments on its own, act as the reader for a counter, or run a tableside or kiosk flow, depending on the mode you put it in.
Set up
- Setup & workstation binding: sign in and bind the device to a workstation.
- Entering Device Settings (the unlock gesture): the gesture that opens the hidden settings panel. Almost every other handheld task starts here.
Choose how it runs
- Modes of operation: one page per mode. The app ships in Order & Pay; the other modes are a single toggle away.
Take payments
- Payment procedures: tips, receipts, refunds, pre-auth, gift cards, and more.
- Push offline transactions: send stored transactions to the server when the network is back.
Run & fix
- Reader & EMV management: reset the reader and recover a lost connection.
- Device Settings reference: every control on the settings panel.
- Common errors: on-screen errors and the decline-code reference.
Reference
- Reference: supported handhelds and readers.
See also
Setup & workstation binding
Purpose: Sign in to the handheld app and bind the device to a workstation so it can take payments.
When to use this: Setting up a new handheld, or moving one to a different workstation.
Sign in
- Open the Vitabyte app.
- On the Login screen, enter your Email and Password and tap Login.
Bind to a workstation
After you sign in, the app shows Select Workstation.
- Find the workstation this device should use. Each one shows its status:
- This Device: already bound to the handheld you're holding.
- In Use: bound to a different device. You'll need to unlink it there first, or pick another.
- No badge, available to bind.
- Tap the workstation, then tap Confirm. The button shows Linking… while it binds.
[INSERT SCREENSHOT: handheld Select Workstation screen showing the This Device / In Use badges]
If you see No workstations available, the workstation configs haven't been set up yet in the cloud. Set them up first, see Cloud · Provisioning configs, then pull the list again.
If binding fails because the workstation is already bound elsewhere, unlink it from that device first, or choose a different workstation.
Switch, reload, or sign out later
These live in Device Settings, not on the bind screen. Open Device Settings with the unlock gesture, then:
- Switch Workstation: bind to a different one.
- Reload: pull the latest config for the current workstation.
- Logout: sign out of the app.
Verify
- The bound workstation shows the This Device badge.
- The header in Device Settings shows the bound Workstation name and the device IP.
- A small test sale completes and returns Transaction Approved!.
See also
- Entering Device Settings (the unlock gesture)
- Modes of operation
- Cloud · Provisioning configs
- Reader & EMV management
Entering Device Settings (the unlock gesture)
Purpose: Open the hidden Device Settings panel on the handheld.
When to use this: Almost every other handheld task starts here, switching workstations, changing modes, resetting the reader, pushing offline transactions, and changing settings all begin by opening Device Settings. There is no button for it on the main screen; you open it with a gesture.
The gesture
From the app's main/logo screen, do this quickly, all three within about 3 seconds:
- Swipe right to the middle of the screen.
- Swipe left back to the middle of the screen.
- Immediately tap the center Vitabyte logo.
The Device Settings panel opens.
 Swipe right to the middle, swipe left back to the middle, then tap the logo, fast.
The whole sequence has to happen in a few seconds. If you're too slow, nothing happens and the screen stays locked, just start over.
If the device is in Checks mode
In Checks mode (tableside / pull-and-pay) the gesture is different: long-press the faint "…" in the bottom-left corner of the screen until Device Settings opens.
Verify
The Device Settings panel appears. The top shows the bound Workstation, the Device id, and the IP.
See also
- Setup & workstation binding
- Device Settings reference
- Modes of operation
- Push offline transactions
- Reader & EMV management
Modes of operation
The handheld app ships defaulting to Order & Pay, which expects the point-of-sale to be running on the same device. The other modes are how the app flexes to different devices and workflows.
- Switching mode is a single toggle. You open Device Settings, find the Payment Mode section, and flip the mode. There's no reinstall and no special build.
- The recommendations below are guidance, not rules. They're the setups that tend to fit each environment best, but you can run whatever mode fits how you work.
The modes
| Mode | What it is | Often used for |
|---|---|---|
| Order & Pay (default) | Takes the order and the payment on the device, with the POS running on the same device. | General service |
| Mobile Terminal | Acts as the card reader for a counter workstation. | Bar |
| Pay-at-table | Pull up an existing check and pay it at the table. | Dine-in |
| Check Streaming | Mirrors the check to a customer-facing display. | Retail |
| Solo / Standalone | Key in an amount and take payment, with no POS. | Quick standalone charges |
| Self-Checkout / Kiosk | A locked-down kiosk the customer operates. | Unattended checkout |
How to switch modes (any mode)
- Open Device Settings with the unlock gesture.
- Find the Payment Mode section.
- Toggle the mode you want (each mode page has the exact control and any extra fields).
- Tap Reload if prompted, then Close and Back To POS.
See also
- Entering Device Settings (the unlock gesture)
- Device Settings reference
- Workstation · Setting up Mobile Terminal
Order & Pay mode (default)
Purpose: Take the order and the payment on the handheld itself.
When to use this: This is the mode the app ships in. It expects the point-of-sale to be running on the same device, so the handheld both rings the order and collects payment. It suits general service where one device does everything. The recommendation is guidance, you can run any mode that fits.
Turn it on
- Open Device Settings with the unlock gesture.
- In the Payment Mode section, set Order&Pay ON.
- Set the RVC to the revenue center this device rings into.
- Tap Close, then Back To POS.
How it works day to day
- The device runs the point-of-sale and the payment app together. Staff ring the order, then take payment on the same screen.
- Back To POS returns from the app to the point-of-sale at any time.
Verify
- The device returns to the point-of-sale when you tap Back To POS.
- A test order can be rung and paid on the one device, ending in Transaction Approved!.
See also
- Modes of operation
- Payment procedures
- Mobile Terminal mode
- Entering Device Settings (the unlock gesture)
Mobile Terminal mode
Purpose: Make the handheld act as the card reader for a counter workstation. The order is rung on the counter; the customer pays on the handheld.
When to use this: When a counter needs a mobile reader instead of a fixed countertop one. Recommended for bars, where a server carries the reader to the guest, but it's guidance, not a rule. This is one half of the setup; the workstation side is in Workstation · Setting up Mobile Terminal.
Turn it on
- Make sure the handheld is on the same network as the workstation.
- Open Device Settings with the unlock gesture.
- Find the Mobile Redirect section and set Redirect: ON.
- In the Target IP / IP:PORT / URL field, enter the workstation's address (for example
192.168.1.20or192.168.1.20:3036), then tap Save. You'll see Redirect target saved. - Tap Close, then Back To POS.
[INSERT SCREENSHOT: handheld Device Settings Mobile Redirect section with Redirect ON and the Target field]
How it works with the counter
The workstation has to be pointed back at this handheld for the pair to work. Set the workstation's Enable Mobile Terminal and Mobile Terminal IP to this device, see Workstation · Setting up Mobile Terminal. Then a sale rung on the counter prompts for payment on this handheld.
Verify
- Ring a small test sale on the counter; the prompt appears on this handheld. Approve it, then void it.
- On the workstation dashboard, Service Stats shows EnableMobileTerminal: true with this device's address.
See also
- Workstation · Setting up Mobile Terminal
- Modes of operation
- Entering Device Settings (the unlock gesture)
- Reader & EMV management
Pay-at-table mode (Checks)
Purpose: Pull up an existing check and pay it at the table.
When to use this: When the payment is brought to the guest, recommended for dine-in, though it's guidance, not a rule. In the app this is the Checks mode.
Turn it on
- Open Device Settings with the unlock gesture.
- In the Payment Mode section, turn on Checks.
- Set Checks RVC # to the revenue center, then tap Save.
- Choose whether to limit the list with My Checks Only: ON/OFF.
- If the device should cover more than one revenue center, set the order under Checks Revenue Centers (in order) and tap Save Revenue Centers.
- Tap Close, then Back To POS.
[INSERT SCREENSHOT: handheld Checks settings showing Checks RVC #, My Checks Only, and Checks Revenue Centers]
Once the device is in Checks mode, the unlock gesture changes: to reopen Device Settings, long-press the faint "…" in the bottom-left corner instead of the swipe-swipe-tap. See the gesture page.
How it works day to day
- The server picks up a check on the device, brings it to the table, and takes payment there.
- My Checks Only keeps a server's list to their own checks.
Verify
- The device lists open checks for the configured revenue center(s).
- A check can be pulled up and paid at the table, ending in Transaction Approved!.
See also
- Modes of operation
- Payment procedures
- Entering Device Settings (the unlock gesture)
- Check Streaming mode
Check Streaming mode
Purpose: Mirror the check to a customer-facing display so the customer can follow along.
When to use this: When the customer should see the check as it's built, recommended for retail, though it's guidance, not a rule.
Turn it on
- Open Device Settings with the unlock gesture.
- Find the Check Streaming section and set Streaming: ON.
- Pick the look that suits the room with Dark Theme or Light Theme.
- Tap Close, then Back To POS.
How it works day to day
- As items are added, the customer-facing view updates so the customer can see what they're being charged for.
- Switch between Dark Theme and Light Theme to match the lighting and the display.
Verify
- The customer-facing display shows the live check.
- Switching the theme changes the display immediately.
See also
Solo / Standalone mode
Purpose: Key an amount directly on the device and take payment, with no point-of-sale behind it.
When to use this: For a quick, standalone charge where there's no check to pull and no POS to ring into. It's guidance, use whatever mode fits.
Turn it on
- Open Device Settings with the unlock gesture.
- In the Payment Mode section, turn on Solo.
- Tap Close, then Back To POS.
How it works day to day
- The operator enters the amount on the device and runs the payment.
- There's no order or check behind it, it's a direct charge.
In Solo mode you can reopen Device Settings by long-pressing the on-screen title. The standard swipe-swipe-tap gesture also works from the logo screen.
Verify
- Entering an amount and running it ends in Transaction Approved!.
See also
- Modes of operation
- Payment procedures
- Self-Checkout / Kiosk mode
- Entering Device Settings (the unlock gesture)
Self-Checkout / Kiosk mode
Purpose: Lock the device into a kiosk the customer operates themselves.
When to use this: For unattended checkout. Once started, the device stays in kiosk until someone enters the exit code, so customers can't wander out of the payment flow. Guidance, not a rule.
Turn it on
- Open Device Settings with the unlock gesture.
- Find the Self-Checkout Kiosk Mode section and set Kiosk Mode: ON.
- Fill in:
- RVC #: the revenue center.
- Table #: the table or station number to use.
- Exit PIN: the code that lets staff leave kiosk mode. Keep it to staff.
- Tap Start to lock the device into the kiosk.
[INSERT SCREENSHOT: handheld Self-Checkout Kiosk Mode settings with RVC #, Table #, Exit PIN, and Start]
How it works day to day
- The customer completes their own checkout on the locked device.
- In kiosk mode the customer can Split a payment or choose Pay Full.
- Staff leave kiosk mode by entering the Exit PIN.
Verify
- After Start, the device is locked into the kiosk flow.
- The Exit PIN returns it to normal use.
See also
- Modes of operation
- Payment procedures
- Solo / Standalone mode
- Entering Device Settings (the unlock gesture)
Payment procedures
Purpose: Take payments on the handheld, the standard sale, plus tips, receipts, refunds, pre-authorizations, and gift cards.
When to use this: Day-to-day payment taking on a handheld in any mode.
Take a payment
- Start the payment from your mode's flow (an order in Order & Pay, a check in Pay-at-table, or an amount in Solo).
- The device shows the Amount Due, with Tax, Tip, and Subtotal as they apply.
- Have the customer tap, insert, or swipe the card when prompted.
- The device confirms Transaction Approved!. A Partial Approval for $… means the card only covered part of the amount, collect the rest separately.
Tips
When the tip prompt is on, the customer sees tip buttons shown as percentages with the dollar amount worked out, plus No Tip and Custom.
- Custom opens Enter Custom Tip for the customer to key an exact amount.
- Which preset is highlighted by default is set in Device Settings → Default Tip Selection (1st, 2nd, 3rd, or None).
Receipts
After approval the device asks How would you like to receive your receipt?:
- Print Receipt: on devices with a printer (such as the A920).
- Email: enter the customer's Email Address.
- Phone: enter the Phone Number for a texted receipt.
- No Receipt.
Tap Done when finished. (A texted receipt includes a short consent line; the customer can reply STOP to opt out.)
Refund
- From the payment flow, choose the refund action.
- Enter the Refund Amount.
- Tap Refund and have the customer present the card if prompted.
Pre-authorization
For tabs and similar, a pre-authorization holds an amount now and captures later.
- When the device asks Pre-Auth, tap Yes to authorize a hold (or No for a normal sale).
- Capture or adjust it later from the cloud portal.
If you keep raising the hold on an open tab and the device throws a declined or parsing gateway error, run it again as a brand-new authorization on the same card. See Common errors.
Gift cards
Choose the gift-card option to open Gift Card Payment, then Swipe Card or Scan Barcode. The app also has flows to redeem, issue, reload, and create gift cards from Device Settings when Gift Card is turned on.
Split payment
Splitting a payment across cards is available in Self-Checkout / Kiosk mode, where the customer can choose Split or Pay Full.
Verify
- A completed sale ends in Transaction Approved!.
- The sale appears in the cloud portal Transactions view.
See also
Pushing offline transactions (SAF)
Purpose: Manually upload the offline transactions a handheld stored while it couldn't reach the server, and send them up.
When to use this: When a device has been taking payments offline (a "store-and-forward" or SAF queue has built up), or you see the yellow pending banner and need to clear it. Follow the steps in order.
Steps
Step 1: Open the app menu
From the main point-of-sale screen, tap the round home/menu button at the bottom center of the device to open the app selection menu.
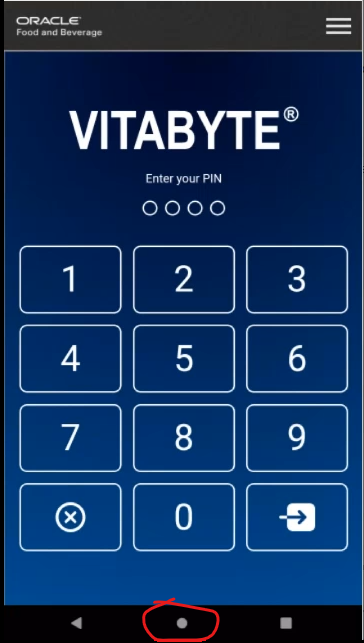 Tap the circular home button at the bottom center to open the app menu.
Step 2: Open Vitabyte
Find and tap the Vitabyte app tile to open the main sync and settings interface.
 Open the Vitabyte app tile.
Step 3: Enter Device Settings
Open the hidden settings with the gesture: swipe right to the middle of the screen → swipe left back to the middle → immediately tap the center Vitabyte logo. Do it quickly. (Full detail: the unlock gesture.)
Swipe right, swipe left, tap the logo, fast.
Step 4: Check what's waiting
Inside Device Settings, scroll all the way to the bottom. Tap the blue SAF Stats button. A pop-up shows how many offline sales, returns, or open totals are pending.
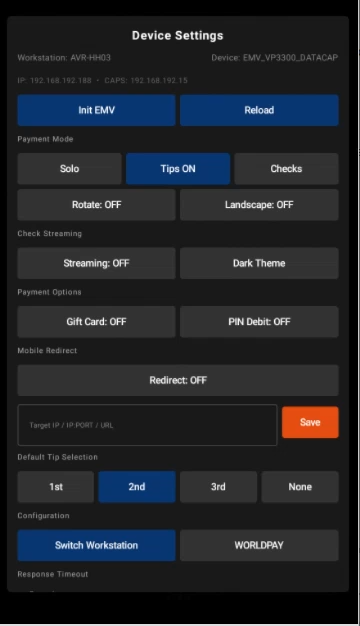 Tap SAF Stats to see the pending offline count.
Step 5: Push the transactions
Tap the green Upload SAF button. The device starts uploading all stored transaction records to the server.
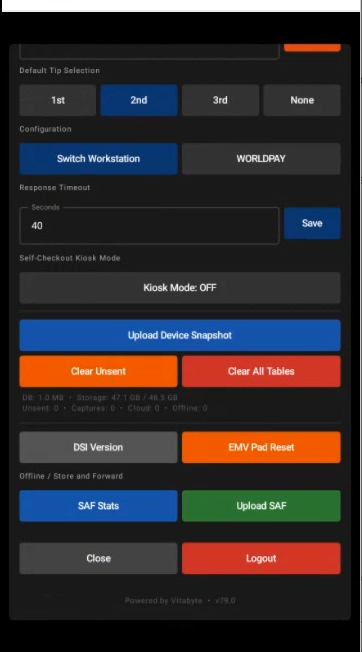 Tap Upload SAF to send the stored transactions up.
Step 6: Close and return to the POS
Once the upload finishes, tap the grey Close button to leave the settings panel. Then tap Back To POS to reload the main point-of-sale layout.
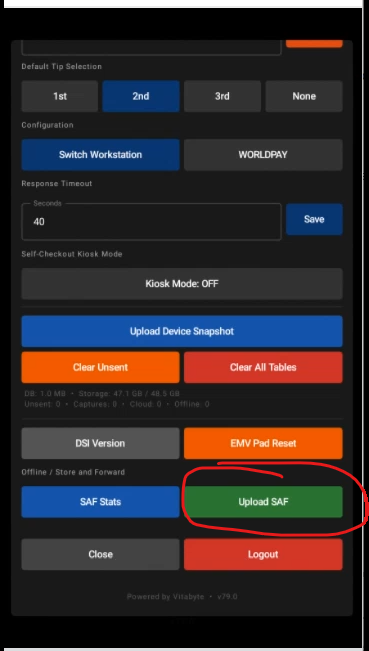 Tap Close, then Back To POS.
Verify
- After the upload, SAF Stats shows no pending transactions.
- The yellow pending banner (for example Offline: 2) clears once everything is sent.
- The transactions appear in the cloud portal.
See also
- Entering Device Settings (the unlock gesture)
- Common errors
- Workstation · Daily procedures (offline push)
- Cloud · Transactions & reconciliation
Reader & EMV management
Purpose: Reset the handheld's card reader and recover it when the connection drops.
When to use this: The reader stops responding, shows Connection Lost, or times out asking for a card.
Reset the reader
Open Device Settings with the unlock gesture, then:
- Init EMV: re-initialize the reader. Use it when the reader isn't picking up cards.
- EMV Pad Reset: reset the pad (under the DSI actions). A quick reset that's safe to try first.
Recover a "Connection Lost"
If a transaction is interrupted, the device shows a Connection Lost modal explaining the reader was disconnected. Work through it in order:
- Tap Retry to reconnect. This clears most cases.
- If it doesn't reconnect, tap Restart App.
- If it still won't reconnect, reboot the device.
You may instead see a Remove Card modal, take the card out of the reader, then tap Retry.
[INSERT SCREENSHOT: handheld Connection Lost modal, showing Retry then Restart App. TODO, the previous image was incorrect and was removed; capture the real modal.]
VP3300 / VP3350 readers
On an IDTech VP3300 or VP3350, if a payment times out the device tells the customer to tap the card on the back of the device, where the reader sits. Have them tap on the back rather than the front and run it again.
Verify
- The reader returns to its ready state and accepts a card.
- A small test sale ends in Transaction Approved!.
See also
- Entering Device Settings (the unlock gesture)
- Device Settings reference
- Common errors
- Reference (supported handhelds & readers)
Device Settings reference
Purpose: A grouped list of every control on the handheld's Device Settings panel, so you know what each one does.
When to use this: When you need to find a specific control, or want to understand the panel as a whole. Open it with the unlock gesture.
At the top, the panel shows the bound Workstation, the Device id, the IP address, and the CAPS address.
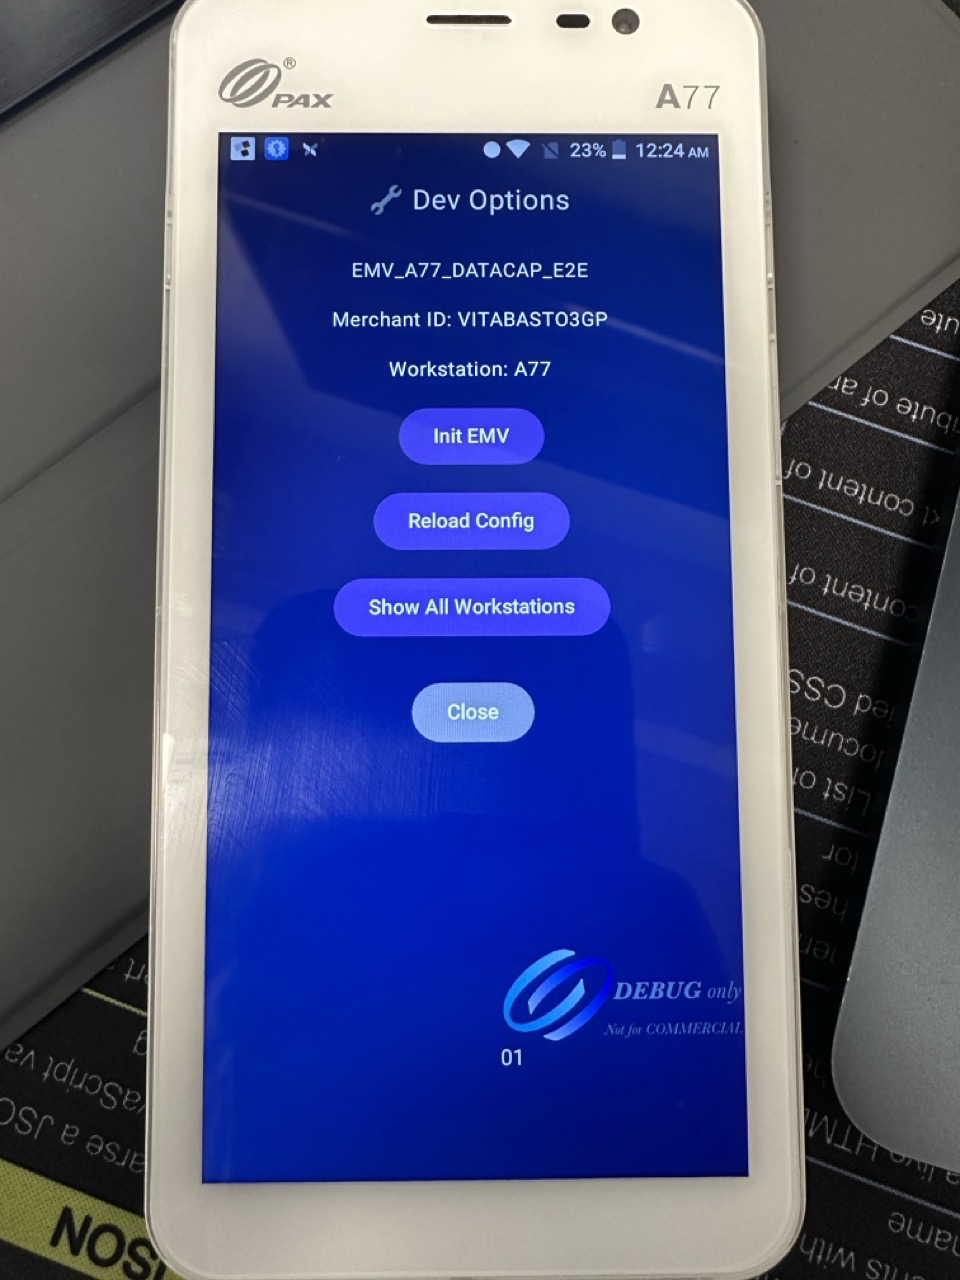 The Device Settings panel, controls are grouped by purpose.
Quick actions
- Init EMV: re-initialize the reader.
- Reload: pull the latest config for the bound workstation.
Payment Mode
- Solo: standalone amount entry.
- Tips ON / OFF: turn the tip prompt on or off.
- Checks: pay-at-table; reveals Checks RVC #, My Checks Only, and Checks Revenue Centers (in order).
- Order&Pay ON / OFF plus RVC: Order & Pay.
Orientation
- Rotate: ON / OFF
- Landscape: ON / OFF
Check Streaming
- Streaming: ON / OFF, with Dark Theme / Light Theme: see Check Streaming.
Payment Options
- Gift Card: ON / OFF: enables the gift-card flows.
- PIN Debit: ON / OFF: allows PIN debit.
Mobile Redirect
- Redirect: ON / OFF, with the Target IP / IP:PORT / URL field and Save: see Mobile Terminal mode.
Default Tip Selection
- 1st, 2nd, 3rd, None: which preset is highlighted by default.
Configuration
- Switch Workstation: bind to a different workstation.
- Processor toggle: shows TSYS or WORLDPAY (the card processor in use).
- Edit API URL: the service address (support-directed).
Response Timeout
- Seconds + Save: how long the device waits for the reader before timing out.
Self-Checkout Kiosk Mode
- Kiosk Mode: ON / OFF, RVC #, Table #, Exit PIN, Start: see Self-Checkout / Kiosk.
Device Snapshot & maintenance
- Upload Device Snapshot: send the device's current state to support.
- Clear Unsent / Clear All Tables: destructive; only use when support directs you. Each asks to confirm and cannot be undone.
DSI actions
- DSI Version: shows the reader-middleware version.
- EMV Pad Reset: reset the reader pad.
Offline / Store and Forward
- SAF Stats / Upload SAF: check and push offline transactions (see Push offline transactions).
Footer
- Close: leave the panel.
- Logout: sign out.
See also
- Entering Device Settings (the unlock gesture)
- Modes of operation
- Reader & EMV management
- Reference (supported handhelds & readers)
Common errors: handheld
Purpose: Match what you see on the handheld to its cause and fix, and look up what a bank decline code means.
When to use this: A payment failed on a handheld, or the app or reader threw an error.
"PSP: User cancelled"
What it means: The device went to sleep mid-payment, so the payment was cancelled.
Fix:
- Press the Home button to wake the device.
- If it's locked, enter the device unlock PIN, 3525, unless your site changed it.
- Retry the payment.
App won't respond, or "Could not communicate with Payment Provider"
What it means: The payment app isn't running or lost its connection.
Fix: Reopen the app by tapping the Vitabyte tile, or tap Back To POS and back in. If it persists, swipe away all open apps and relaunch.
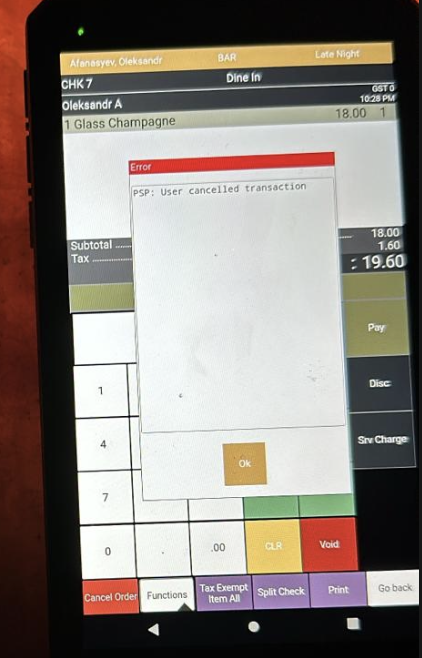 Relaunch the app from the Vitabyte tile if it stops responding.
Payments cancel on their own
What it means: Usually the device is low on battery or in a power-saving mode that suspends the app.
Fix:
- Charge the device and turn off battery saver / low-power mode.
- Confirm the Merchant ID is set and the device's deployment was activated.
- Retry.
Payments are slow
What it means: Weak or dropping Wi-Fi.
Fix: Move closer to the access point, or get the device onto a stronger network. Slow approvals are almost always the network.
"Suspected Fraud" while testing
What it means: A test card tripped the issuer's fraud check (code 59).
Fix: Use a debit card for test transactions instead of the card that's being flagged.
Card times out / "Remove Card"
See Reader & EMV management, retry, and on a VP3300/VP3350 tap the card on the back of the device.
Decline-code reference
When the bank declines a card, the app shows a short code. These come straight from the card issuer as the app reads the response, none are invented.
The device shows which processor it's using (TSYS or WORLDPAY) in Device Settings.
- TSYS returns the two-digit code directly.
- WorldPay sometimes returns a three-digit code, which the app maps to the same meaning: 605 → 05 (do not honor), 651 → 51 (insufficient funds), 714 → 15 (no such issuer), 756 → 54 (expired card).
| Code | Meaning |
|---|---|
| 01 | Refer to issuer |
| 02 | Refer to issuer, special condition |
| 03 | Invalid merchant ID |
| 04 | Pick up card (no fraud) |
| 05 | Do not honor (bank decline, the most common) |
| 06 | General error |
| 07 | Pick up card, special condition (fraud) |
| 12 | Invalid transaction |
| 13 | Invalid amount |
| 14 | Invalid card number |
| 15 | No such issuer |
| 19 | Re-enter transaction |
| 21 | Unable to back out |
| 28 | File temporarily unavailable |
| 39 | No credit account |
| 41 | Lost card, pick up |
| 43 | Stolen card, pick up |
| 51 | Insufficient funds |
| 52 | No checking account |
| 53 | No savings account |
| 54 | Expired card |
| 55 | Incorrect PIN |
| 57 | Transaction not permitted, card |
| 58 | Transaction not permitted, terminal |
| 61 | Exceeds withdrawal limit |
| 62 | Invalid service code, restricted |
| 63 | Security violation |
| 65 | Activity limit exceeded |
| 75 | PIN tries exceeded |
| 79 | Already reversed at switch |
| 80 | Invalid date |
| 81 | Cryptographic error |
| 83 | Cannot verify PIN |
| 93 | Violation, cannot complete |
| 94 | Unable to locate, no match |
| 96 | System malfunction |
The everyday short version is on the manager quick reference.
See also
- Reader & EMV management
- Push offline transactions
- Common POS errors (quick reference)
- Workstation · Common errors
Handheld reference
Purpose: Look up the supported handhelds and readers, and the secure-device profile each one uses.
When to use this: When you're choosing or provisioning a handheld and need the exact Secure Device value.
Supported handhelds
| Device | Notes |
|---|---|
| PAX A920 | Built-in reader and printer. |
| PAX A920 Pro | Built-in reader and printer; current default. |
| PAX A77 | Built-in reader. |
| PAX A3700 | Built-in reader. |
| PAX A6650 | Built-in reader. |
External readers
| Reader | Notes |
|---|---|
| IDTech VP3300 | Tap/insert reader. On timeout, tap the card on the back of the device. |
| IDTech VP3350 | Tap/insert reader. On timeout, tap the card on the back of the device. |
Secure Device profiles
The Secure Device value in the cloud config must match the device, or the handheld won't take payments. These are the handheld-relevant values:
| Device | Secure Device value |
|---|---|
| PAX A920 Pro | EMV_A920PRO_DATACAP_E2E |
| PAX A77 | EMV_A77_DATACAP_E2E |
| PAX A3700 | EMV_A3700_DATACAP_E2E |
| PAX A6650 | EMV_A6650_DATACAP_E2E |
| IDTech VP3300 | EMV_VP3300_DATACAP |
| IDTech VP3350 | EMV_VP3350_DATACAP_E2E |
The full list, including countertop readers and encrypted (P2PE) variants, is on the workstation Secure Device reference.
See also
- Setup & workstation binding
- Reader & EMV management
- Workstation · Reference (full Secure Device table)
- Cloud · Provisioning configs
Cloud Portal
The merchant web portal. It's where every payment from the workstation and the handheld shows up, where you reconcile against the processor, and where you set the configuration that devices pull back down.
Reporting & money
- Transactions & reconciliation: transactions, batches, disbursements, statements, chargebacks, and the weekly reconciliation.
Set up devices
- Provisioning configs: create and edit the workstation and handheld configs that devices pull down. Start here for the three values that break things if they're wrong.
Order & Pay
- Order & Pay / QR setup: QR codes, the customer menu, and the Order & Pay configuration.
- Charge to room: let checked-in guests settle to their room.
- Operating Order & Pay: review incoming orders and pause/resume ordering.
See also
Transactions & reconciliation
Purpose: Find and act on individual transactions, close batches, see the money that's been disbursed, and reconcile the week against the processor.
When to use this: Daily transaction lookups and adjustments, end-of-day batch close, and weekly reconciliation. Everything here is fed by payments taken on the workstation and the handheld.
Transactions
Open Transactions from the sidebar. The top of the page shows Total Volume and Total Count, a Transaction Totals by Card Brand chart, and a Performance Over Time chart. (The over-time chart shows activity only, it notes that it excludes tips and captures.)
A Transaction Source switch flips between Card Present and Card Not Present.
Find a transaction
Open Advanced Filters and filter by Account (Last 4), BIN (First 6), Invoice, Amount, TranCode, Batch, Brand, Status, Reference Number, or Check Number. Tick Show Only Captured Transactions to hide open authorizations. Tap Apply Filters, or Clear Filters to reset.
Act on a transaction
Open the row's Actions menu:
- Capture: settle an authorization (with Void Auth, Increment Auth, and Partial Reversal alongside).
- Void Sale: void a sale that hasn't settled.
- Adjust Gratuity: change the tip on a transaction (confirm with Confirm Adjustment).
- Return / Refund: refund a settled sale.
From the toolbar you can also Generate Invoice and Export CSV.
Close a batch
- From the toolbar, open Batch summary.
- The Batch Summary & Close dialog shows the Batch No., Item Count, and Net Batch Total.
- Tap Confirm & Close Batch.
If there's nothing to settle you'll see No open batch to settle for this account.
[INSERT SCREENSHOT: portal Transactions page with the volume/count tiles, card-brand chart, and the Actions menu open]
Financials
The Financials group in the sidebar holds:
- Batches: settlement batch records.
- Disbursements: funds disbursed to the account.
- Statements: billing statements; open one and use Export PDF.
- Chargebacks: disputes and their detail. A banner flags You have N new dispute(s).
Reports
The Reports page has three tabs.
Weekly Reconciliation
This compares the point-of-sale against the processor, per card brand, for each day. Each line shows POS (Simphony), Processor, the Difference, and a Status:
- Match (within $0.01)
- Close (within 1%)
- Mismatch (over 1%)
Click a day to see the full breakdown. For a transaction-level view, use Run deep reconciliation, it lines up every transaction and labels each Matched, POS Only, SPI Only, or Processor Only. Export CSV saves the result.
Tip Reconciliation
Checks that tips made it from the point-of-sale to the processor. The Card Tip Reconciliation view shows Processor Tips, POS Reported, and the Overage, and flags each as Verified, Recovered (POS reported $0 but the processor has a real tip), or Unaccounted (no POS match). This is what catches a tip that dropped off a check before it batched.
Employee Sales Mix
Sales by employee, Total Sales, Total Checks, and Items Sold, with Top Performers. Pick a specific location to populate it.
Signed Receipts
The Signed Receipts page lists signed receipts with Daily, Weekly, and Monthly totals. Open a row to View Customer Receipt, or resend it to an email.
If you see "BI location not configured. Please set up your location reference.", the reporting location hasn't been linked yet. Set the location reference before the reconciliation reports will populate.
See also
- Cloud · Provisioning configs
- Workstation · Daily procedures
- Handheld · Payment procedures
- How it all fits together
Provisioning workstation & handheld configs
Purpose: Create and edit the configuration each device pulls down, the Merchant ID, the reader, the tip presets, mobile terminal, routing, and the rest.
When to use this: Setting up a new workstation or handheld, or changing how an existing one behaves. After you save here, the device picks up the change on its next reload (workstation: Reload Workstation Config; handheld: Reload in Device Settings).
Three values break things if they're wrong. Read these before anything else:
- Workstation Name: wrong value and the workstation service won't start.
- Secure Device: wrong value and handhelds stop working.
- Com mode: wrong value and payments stop.
Open the workstations list
In the portal, open Workstations. There are two sections: Workstations and Handhelds. Tap Create Workstation to add one, or open an existing one to Edit, Duplicate, or Delete it.
[INSERT SCREENSHOT: portal Workstations list showing the Workstations and Handhelds sections]
The three values that break things
Workstation Name = the machine's hostname
The workstation service finds its config by the PC's Windows hostname. The portal field that has to match it is Workstation Name.
If Workstation Name doesn't exactly equal the machine's Windows device name, the service can't find its config and won't start. The portal gives no warning, so set this carefully.
To find the PC's hostname: on the workstation, press Windows + R, type cmd, press Enter, and run hostname. Put that exact value in Workstation Name. See Workstation · Install & reinstall.
Secure Device
Secure Device tells the device which card reader it's driving. It's a free-text field, there's no dropdown, so the value has to be exactly right for the reader model.
A wrong Secure Device value stops handhelds (and counter readers) from working. Copy the exact value for the model from the Secure Device reference. For example, a Verifone P400 is EMV_P400_DATACAP_E2E; a PAX A920 Pro is EMV_A920PRO_DATACAP_E2E.
Com mode
COM Mode tells the workstation how the reader is connected. The valid values are USB or NET.
A wrong COM Mode stops payments. Use USB for a USB-connected reader. Use NET for a network reader, which then needs a Pin Pad Address (for example 127.0.0.1) and a Pin Pad Port (for example 1235).
The other fields
- Merchant ID: the account this device settles to.
- Workstation Type: Workstation or Handheld. Handheld type exposes extras like Enable Auto Rotation and a Minimal Receipt option.
- Enable Mobile Terminal: turns on using a handheld as this workstation's reader; set the Mobile Terminal IP (for example
192.168.1.52) and Port (3036). See Setting up Mobile Terminal. - Tip Percentages: the suggested tip presets (for example
[18,20,25]), plus On Screen Gratuity and Gratuity Suggestions. - CAPS IP: the address of the site's central server (for example
192.168.15.155). - Cert Mode: CERT or PROD.
- Deployment ID, logo and color, and the offline limits round out the form.
Alternative Routes (multi-MID)
For a site that runs more than one merchant account on one workstation, add Alternative Routes, each pairs a Merchant ID with the Host IP it should use (for example 192.168.1.10). This is how RVC routing is configured.
Handheld configs
Handhelds appear under the Handhelds section. The Secure Device and Com mode rules above apply the same way, a handheld with the wrong Secure Device value won't take payments.
Verify
After saving:
- On a workstation, open
http://localhost:3036/api/dashand press Reload Workstation Config; check Service Stats reflects the change. - On a handheld, open Device Settings and tap Reload.
- Run a small test sale to confirm the reader works.
See also
- Workstation · Install & reinstall
- Workstation · Settings & configuration
- Workstation · RVC routing
- Handheld · Setup & workstation binding
- Secure Device reference
Order & Pay / QR setup
Purpose: Set up the QR codes guests scan, the menu they see, and how Order & Pay behaves.
When to use this: Standing up Order & Pay for a location, or changing the menu, branding, or rules.
Open Order & Pay in the portal. It has an Orders tab (covered in Operating Order & Pay) and a Menu management tab.
Generate a QR code
In the Pay at Table QR Generator:
- Choose the QR Type:
- Payment: the guest scans to view and pay an existing check.
- Order: the guest scans to browse the menu and place a new order.
- Pick the Revenue Center.
- Optionally set a Table Number.
- Generate the code, then Download PNG to print it or Open Link to test it.
A site-wide Landing QR is available too (see Branding & landing).
[INSERT SCREENSHOT: portal Pay at Table QR Generator with the Payment/Order toggle, Revenue Center, and Download PNG]
Manage the menu
In Menu management:
- Pull from POS to import the current menu. (An empty location prompts Pull menu from POS.)
- Edit what guests see. Use Add from POS to bring in a category, and edit items as needed.
- Publish to push the changes live. You'll confirm with Publish menu changes?.
Until you publish, an unpublished banner reads Draft not yet published., guests keep seeing the un-curated POS menu until your edits go live.
Reset (Reset to POS menu?) throws away every unsaved edit for that revenue center and starts over from the current POS menu. Re-syncing mid-edit discards unsaved edits too. Publish first if you want to keep your work.
Configuration
- Require Payment with Order: when on, guests must pay when they order; when off, orders go to the kitchen without payment.
- Menu Categories: choose which categories guests see (none selected shows all).
- Tip configuration: turn the tip section on and set the Quick-pick percentages.
- Pickup & delivery fees: set fees per order type.
- Branding: Accent color, Logo URL, and the landing graphic.
- Locations & landing page (Confirmed RVCs): the locations shown on the landing page, plus the Landing QR (with Copy and PNG).
- Default employee for new orders: orders fail until one is set.
- Tender configuration: which tenders settle Order & Pay payments.
Verify
- Open Link on a generated QR loads the customer page.
- After Publish, the customer page shows your curated menu and the Draft not yet published. banner is gone.
See also
Charge to room
Purpose: Let a checked-in guest settle an Order & Pay check to their room after a one-time verification. The order posts on a tender you choose, and the matching charge posts to the guest's folio.
When to use this: Properties with a connected property-management system that want room-charge as a payment option in Order & Pay.
Prerequisites
Before a guest can charge to a room, all of these must be true:
- The property-management connection (Opera PMS) is configured and connected.
- The three setup values below are set.
- The guest is checked in, and the room isn't posting-restricted.
- A published menu exists for the revenue center.
Setup
Open the Charge to room tab (under the employee configuration), and set:
- Enable charge to room, shows the option to guests at checkout.
- Room charge tender, the tender that settles a room-charge check. It must be a settlement that does not itself post to the property-management system, or the folio gets charged twice.
- Folio transaction code, the code the charge posts under on the folio.
- Cashier id, the property-management cashier id used for the posting.
You can override the folio code and cashier per revenue center under Per-revenue-center routing; anything left on Use default falls back to the values above.
The toggle is gated: set the tender, transaction code, and cashier id before enabling. Confirm the Opera PMS integration shows connected (configured on its own Opera PMS Configuration card, tap Configure Opera if it isn't).
[INSERT SCREENSHOT: portal Charge to room setup with Room charge tender, Folio transaction code, and Cashier id]
The guest flow
- At checkout the guest picks Charge to room.
- They find their reservation by Room #, Last name, Phone, or Confirmation #. (Only checked-in reservations match; if none do, they see No checked-in reservations found.)
- They tap Send code to send a verification code to the contact on file (by text or email).
- They enter the 6-digit code. On success the panel shows Guest verified.
- They tap Charge $… to room to post the charge.
If a room can't take charges, the guest sees Charges can't be posted to this room. Please see a staff member.
Verify
- A test reservation can be found, verified with the 6-digit code, and charged.
- The charge appears on the guest's folio, and the Order & Pay check shows settled on the room-charge tender.
See also
Operating Order & Pay
Purpose: Watch incoming Order & Pay orders, check the detail on any one, and pause or resume ordering when you need to.
When to use this: Day-to-day, while Order & Pay is live, keeping an eye on orders and stopping the flow during a rush or an outage.
Review orders
Open the Orders tab on the Order & Pay page. It lists recent submissions with the time Placed, the Check #, Status, Table, RVC, and the Subtotal / Tax / Paid / Due. Tap Reload to refresh. An empty location shows No orders yet for this merchant.
Click a row to open the check snapshot: the Items, Totals, Tenders, and Identifiers. Use View customer receipt to open the receipt the guest received.
[INSERT SCREENSHOT: portal Orders tab with the list and a check snapshot open]
Pause and resume ordering
When you need to stop new orders, a rush, a kitchen issue, an outage, pause ordering without taking the QR codes down.
- In the menu editor header, find Pause incoming orders.
- Turn on Pause online ordering. The QR codes keep working, but guests see your message instead of the menu.
- Set the message guests should see, or tap Use maintenance template for a standard one.
- To reopen, turn the toggle back off (Online ordering active).
The standard maintenance message reads:
Online ordering is temporarily unavailable while we update the system. Please flag down a server or visit the bar to place your order. Thanks for your patience!
If you pause without a message, guests see the fallback:
We're not taking online orders right now. Please flag down a server or stop by the bar to order. Thanks for your patience!
Verify
- A new order placed from a QR appears in the Orders list.
- While paused, scanning an ordering QR shows your message; after resuming, it shows the menu again.